Monday, December 7, 2015

Making Christmas Magical: 12 Days of Christmas activities for families

I am not one of those moms who usually goes "all out" on holidays. I have lots of good intentions, but very little follow through. But this year is going to be different! I wanted to find some activities that didn't require any specialty-store ingredients and required little prep time. Basically, I wanted something for my preschooler & first grader to do in the days leading up to Christmas--especially those days when there's no school!

I originally saw this idea HERE on katherinemaries.com, but I ended up coming up with some new days of my own and taking/deleting some activities the site suggested. I found a ton of ideas on pinterest (so if some of the crafts or activities don't immediately make sense, just type them in the search bar on pinterest) and I especially loved all the paper plate crafts I found on this site .

The ideas printed on each card are suggestions of things my kids and I can do, but I'm not expecting to get them all done. We'll just pick and choose what works best for us. Also, I hate the idea of constantly having to get online to look for recipes/craft ideas so I included pictures of the crafts and recipes right on the cards. And lastly, there's not right or wrong order for these 12 days! I might let my kids pick a card each day or I'll pick one that fits with whatever else we have that day.

Simple, fun ideas for everyday moms and kids.
This would even make a cute neighbor gift! 

These print on a regular sheet of printer paper or cardstock. Just cut down the middle after printing. Besides the cards, you'll need basic art supplies and a stack of cheap paper plates if you're doing the paper plate crafts. I also own most of the videos/books suggested but you should be able to find them at your local library and on netflix/amazon prime video.

Here are some of our activities for Mr. Grinch Day. We invited two neighbor friends to join us today. We started by reading How the Grinch Stole Christmas by Dr. Seuss. Then, we made our a Grinch craft out of paper plates.
 Next, the kids helped me bake "grinch cookies" They each took turns putting the ingredients into the bowl. They especially loved seeing the dough turn green. For my favorite chocolate chip cookie recipe, go HERE
 While the cookies were baking I turned on the classic, cartoon version of How the Grinch Stole Christmas. When the movie was over I called them over to the table for their snack. The picture of the cookies looks washed out, but trust me, with 10 drops of green food coloring, they were plenty green!


 For dinner that night I made "grinch rolls" However, dying the roll dough didn't make them green...more like a white and green marble...which the kids still thought was cool. Click HERE for my tried and true roll recipe.
 We also ate "Who Stew" aka Chili. I told my kids this is what the Who's from Whoville eat for dinner rather than saying the stew was made out of Who's (yuck!) And click HERE for our all time favorite chili recipe.

 This was a easy, fun day and my kids can't wait for us to do another activity day soon!
And that's the beauty of these "days" If you get overwhelmed easily, like I do, spread the days out so you're not necessarily doing one every day for 12 straight days. Choose what works best for your family.
 To download the GRINCH & NATIVITY DAY, click HERE
 
To download the AROUND THE WORLD and REINDEER DAY, click HERE
Just a side note on this day: you might be wondering why the heck my kids will learn how to say merry Christmas in Indonesian. My in-laws served a mission there for our church so Indonesia is regularly talked about at our house.
To download the St.NICHOLAS DAY and CHRISTMAS TREE DAY, click HERE
To download CANDY CANE DAY and ELF DAY, click HERE
To download the CHRISTMAS KINDNESS DAY, and POLAR EXPRESS DAY, click HERE
To download the FROSTY DAY and GINGERBREAD DAY, click HERE

These printables are for personal use only. Please don't use them commercially in any form.

Don't forget to check out my ETSY SHOP to see if there's anything that will make your holiday bright! And please feel free to like, share, and pin this post! Word of mouth really helps my small business out. I also do custom orders, email or send me a convo on etsy to get started! Thanks for stopping by!

Wednesday, December 2, 2015

Confessions of a Wannbe Seamstress: Lined Flannel PJ Tutorial

 It's been a long standing tradition in my family to get pajamas on Christmas Eve. Growing up in a family of five children, this often meant our pajamas were made by my mother. One year we we even got lap quilts (or TV watching quilts) to go with our PJs. As I've begun my own sewing journey I realize now just what a labor of love it was for my mother to sew five pairs of pajamas in different sizes and patterns.

Now that I've started my own family I've incorporated this same tradition with my children. In fact, pajamas on Christmas Eve was a tradition in my husband's family too! In years past, we've bought our kids PJs, but this year I decided to make them. And let me tell you, it was so simple! Depending on the size of the PJs I could get 1-2 pairs done in an afternoon while my son took his nap and my older two were at school. I loved doing this so much, I even made a fourth pair for my nephew.
Let's get started! Around Thanksgiving, JoAnne Fabrics has seriously crazy sales on their flannel. I got flannel for 75 % off! That was only a little over a $1 per yard. I bought a yard of fabric for each pair of PJs I made. Also, these are lined with flannel too to make them extra warm and cozy. So I bought a yard of white flannel for each pair too.You'll also need elastic for the waist.

For the basic pattern I used this pattern and tutorial from danamadeit.com. I printed the pattern out (it's sized for a 3 year old) so for the other sizes, I used an existing pair of pajama pants to make the pattern longer/shorter. I found the waist size and the leg width to be good for the sizes I made: a child's 6x, 4T, 24 months, and 12 months. The waist size was good because once you add the elastic for that specific size, it will cinch up to the right size.

First, print and cut out the pattern and tape it together. If you're making a size bigger/smaller then have a pair of pants on hand to see how much bigger/smaller you need to cut the length. TIP: leave PLENTY of extra length for folding the waist over and hemming the bottoms. You can always cut off excess later. If you're making a pair for a larger child that needs extra width on the pattern, just use your existing pair of PJs as a guide and trace around it. Just be sure to give yourself extra room for sewing your seams. In my case, I always give myself LOTS of extra room... I tend to sew pretty wide seams.

Since these are lined, you'll need to cut out a set of front and back pieces on white flannel and a set of front and back pieces on your patterned flannel--so you'll have a total of 8 pieces cut out (or 4 sets). Again, if you're making you're own pattern look how the original pattern has a slight angle on the waist of the front pieces. This gives the pants a better fit.
After your pieces are cut out, you'll need to turn them so right sides are together and sew along the curved part from the waist to that little point in the bum. TIP: after I've sewed this part, I lay the pieces flat on my machine and do a zig-zag stitch right through the seam I just sewed. I figure these PJs are for kids and this area is the bum/crotch area and is going to see lots of running, jumping, climbing, and crawling around on the floor. I like to reinforce them so they'll be as sturdy as possible.
 8 pieces become 4 So now you'll have your 4 main pieces to work with.
 Find your front and back pieces (the front pieces will have a slightly dipped waist) in the white and pattern and match them up. You'll pin them wrong sides together (right sides facing out)
 The easiest way to pin is to start with the crotch. Line the crotch of each piece up, pin it, then pin the inner legs. Then I pin the corners up by the waist and then down the outer legs.
 Start sewing the inner leg first in one continuous line. Then sew along the waist. Finally, sew each side of the outer leg. I don't sew the very bottoms of the legs because that's the part I'll cut off to adjust for length. I do another zig-zag stitch from crotch to waist to help reinforce the two layers of flannel. Now your 4 pieces just became 2.
 2 pieces become 1: Now you'll pin your two pieces wrong sides together. again, line up the crotch and pin there. then the inner leg. then the two points on the sides of the waist and finally the outer legs.
 Sew starting with the inner leg so it's one continuous line. Then sew up the outer legs. DON'T SEW from the crotch up to the waist in this step or around the waist or you'll sew your PJs together!!! I do sew a zig-zag stitch along the leg seams to help reinforce and this also keeps the edges from fraying. Once everything is sewed, turn them right side out and give it a good iron. They're starting to look like PJs already and don't they feel so soft and cozy? The two layers of flannel really make a difference.
 Now for the waist. I do this by making a casing. You can see a tutorial here. After the elastic is in, I sewed around the unfinished edges of the casing with a..you guessed it...zig-zag stitch to prevent fraying.
 Finally, hem your pants. This is where you can cut off any excess length (remember, leave it slightly long so you can still hem them. I also a little bit extra length beyond that so the kids can wear them longer and to foresee any shrinking from washing. Pin your hem to the length you want. Then I iron my crease before I sew. After, I did another zig-zag stick around the hem to prevent fraying.
And Ta-Da your're done! Sadly I don't have any pictures of little ones modeling them because these are for Christmas. But they all turned out so cute and I can't wait to give these to them on Christmas Eve! I'll probably find some inexpensive thermal jammie-type shirts at Wal-Mart or KMart to finish the set.
Don't forget to check out my ETSY SHOP to see if there's anything that will help you this holiday season. And feel free to like, share, and pin this post. Word of mouth really helps my small business. Thanks for stopping by!

Monday, November 30, 2015

CYBER MONDAY SALE

offer ends December 04. Don't wait, you won't see an offer like this until next year. I also have some spots left for custom Christmas cards. Email or send me a convo on etsy to create yours today!

Monday, November 16, 2015

Thanksgiving Printable Roundup!


Give Thanks Subway Art--click here
Each Day I am Thankful for Subway Art in gray--click here
Each Day I am Thankful for subway art in white--click here
In everything give thanks..white--click here
In everything give thanks...striped--click here
But I think I love fall most of all--click here

Don't forget these freebie printables are available for personal use only. And check out my etsy shop to see if there's anything that help you this holiday season. I'm currently taking orders for custom Christmas Card designs. Send me an email or etsy convo for more information.  Thanks for stopping by!

Saturday, October 10, 2015

Monthly Milestone Stickers--Just $7 SHIPPED!!


My monthly milestone stickers are back on groopdealz! For just $7.25 shipped, you can choose one of several sticker set designs. This is a 60% discount from their regular price on my etsy store. But hurry, some of these patterns are already selling fast!! These sets are perfect to have on hand for a last minute baby gift and make great stocking stuffers for new moms!

Just follow the link to the groopdealz website: http://www.groopdealz.com/deal/monthly-milestone-stickers-set-4-styles/77433

Thursday, October 8, 2015

Fun With Felt Pt. 3

 This is the third installment of my fun with felt series. We've already done felt food and felt play-mats. I was inspired for this next project because my sister in law, after seeing my own kids' Halloween costumes this year, jokingly asked me to make one for her 18 month old son. I don't think she expected that I really would! But once she told me he was going out dressed as a doctor, I had so many fun ideas running through my head, and I couldn't resist whipping something up.

Materials Needed:
  • half yard of white felt materials from the bolt, not the little squares.
  • scraps of other felt colors to make the Dr. tool accessories. You'll have plenty of white felt materials left over from your vest to make the pockets and Dr. accessories that need white.
First, cut out your vest using this tutorial here on danamadeit.com This is my go to vest for all things dress up. There are SO MANY variations to this vest (so far I've made a vest for Woody the Cowboy, a pirate, and now a doctor)  and it's so simple to make.

Once you have your vest pieces cut out, don't sew them together yet. First, add the dr. details. At the end I'll tell you the exact order and how I assembled my vest.

The hardest part of this project was getting the tools proportioned to the vest and to look good. I was inspired by this pin from the storytimekatie website. However, she said when she made the Dr tools she just printed out clip art images. I had a really hard time finding images that would work for what I wanted/needed so I just freehand drew my own. But the good news is, you don't have to! Drawing and erasing and redrawing took a lot of work, so I made sure to save my patterns. All you need to do is print the patterns out on a regular-sized piece of printer paper.
Click HERE to get the pattern

The easiest way to make your dr. accessories is to print them on paper or cardstock, cut them out and then pin them to your material and cut them out using a good pair of sewing scissors. The reflex hammer-thing (what is that thing actually called?) is two pieces. I just sewed the grey part over the top of the blue part. The eyelight is one piece of black felt with a tiny circle cut out of white felt. The band-aid is flesh colored felt, a square of white felt and a red felt heart on top. I secured the white pad and red heart to the "band aid" separately before I sewed the entire thing to the vest.
 I didn't include the cross with my pattern, but you can print out or draw a plus sign on a piece of paper and use that. For the medicine bottle, I cut out the entire bottle on white felt then cut out just the lid on gray and sewed it on. then cut out just the bottle shape on pink and sewed it on. The thermometer is all on white and I used red and black markers to add the details.
 The stethoscope was tricky. It's 3 pieces. I sewed the back piece on first. then I lined up the two side pieces so it would look like all one piece. I cut the entire stethoscope out using black felt. I sewed the grey circle over the black one for the little pump. For the ear pieces, I cut just the U shape out in gray, then I actually trimmed the black U shape down so I could lay the black piece on top of the gray U. I hope that makes sense. The gray U shape kind of comes over the middle of vest, so I hand sewed just the "ear pieces" in place.
Tips for assembling the vest:
  • Sew the back piece of stethoscope first. Then line up the two side pieces and pin in place so it looks like one piece. sew the two side stethoscope pieces in place.
  • Sew the red cross on the back
  • sew the red cross on the front
  • pin all your dr. accessories (except the band aid) in place. Sew them.
  • cut your pockets to the size you want. Place them over the accessories and pin and sew pockets in place (leave the top of the pockets open)
  • Pin and sew the band-aid in place.
  • Sew your vest together. Don't forget to sew it right sides together so your shoulder and side seams are hidden!
It's always fun to see an idea become a reality. I thought this vest turned out really cute and I sure hope my little nephew loves it. Don't forget to visit my etsy shop to see if anything catches your eye. Thanks for stopping by!

Tuesday, October 6, 2015

Confessions of a Wannabe Seamstress: DIY Pirate, Mermaid, Shark tutorial

If you're looking for the free Halloween/Fall printables, click HERE

This is the third year of my DIY costume series. For year 1 click HERE. For Year 2 click HERE

 If you've been following the blog, you might remember that a new little guy joined our family last October. He was only 2 days old last Oct 31, so this year is my first time getting to dress him up into something seriously cute. Also, if you've been following, you know that I have an obsession with making my kids' costumes have a theme. I am not sure how much longer I will be able to continue with this as my older two are starting to get a little more opinionated about their costumes and probably won't always want their costumes to "match". But I will ride this train as long as I can!
 PLEASE NOTE: I am not a professional seamstress. I make many, many mistakes and my goal of these tutorials to help you not make the same mistakes I did and to take those pinterest inspirations (i.e. usually no patterns and sometimes confusing tutorials) and turn them into something that anyone can do. There will probably be things that I do poorly or that you can do better. By all means DO! Improve upon this tutorial and make it your own. Enjoy the journey as you sew and improve. I know I am!

First Up: Baby Shark Costume
  • 1/2 yard of gray fleece (for the body and hat)
  •  1 sheet of gray felt (for the fin)
  •  1 sheet of white felt (for the shark stomach, eyes & teeth)
  • scrap of black felt (for the eyes)
  • scrap of red felt (for the shark gums) 
  • some elastic if you want the shirt to be gathered at the bottom but this is optional.
  •  I was able to find some gray pants and a shirt I already had to use as the costume base
to make the shark body I followed the same guidelines I used last year to make my son's olaf costume. Unfortunately, when I went to find that same tutorial from fabric.com, it was gone so I had to recreate it from memory. The great thing about this tutorial is it can easily be adapted to fit any size.

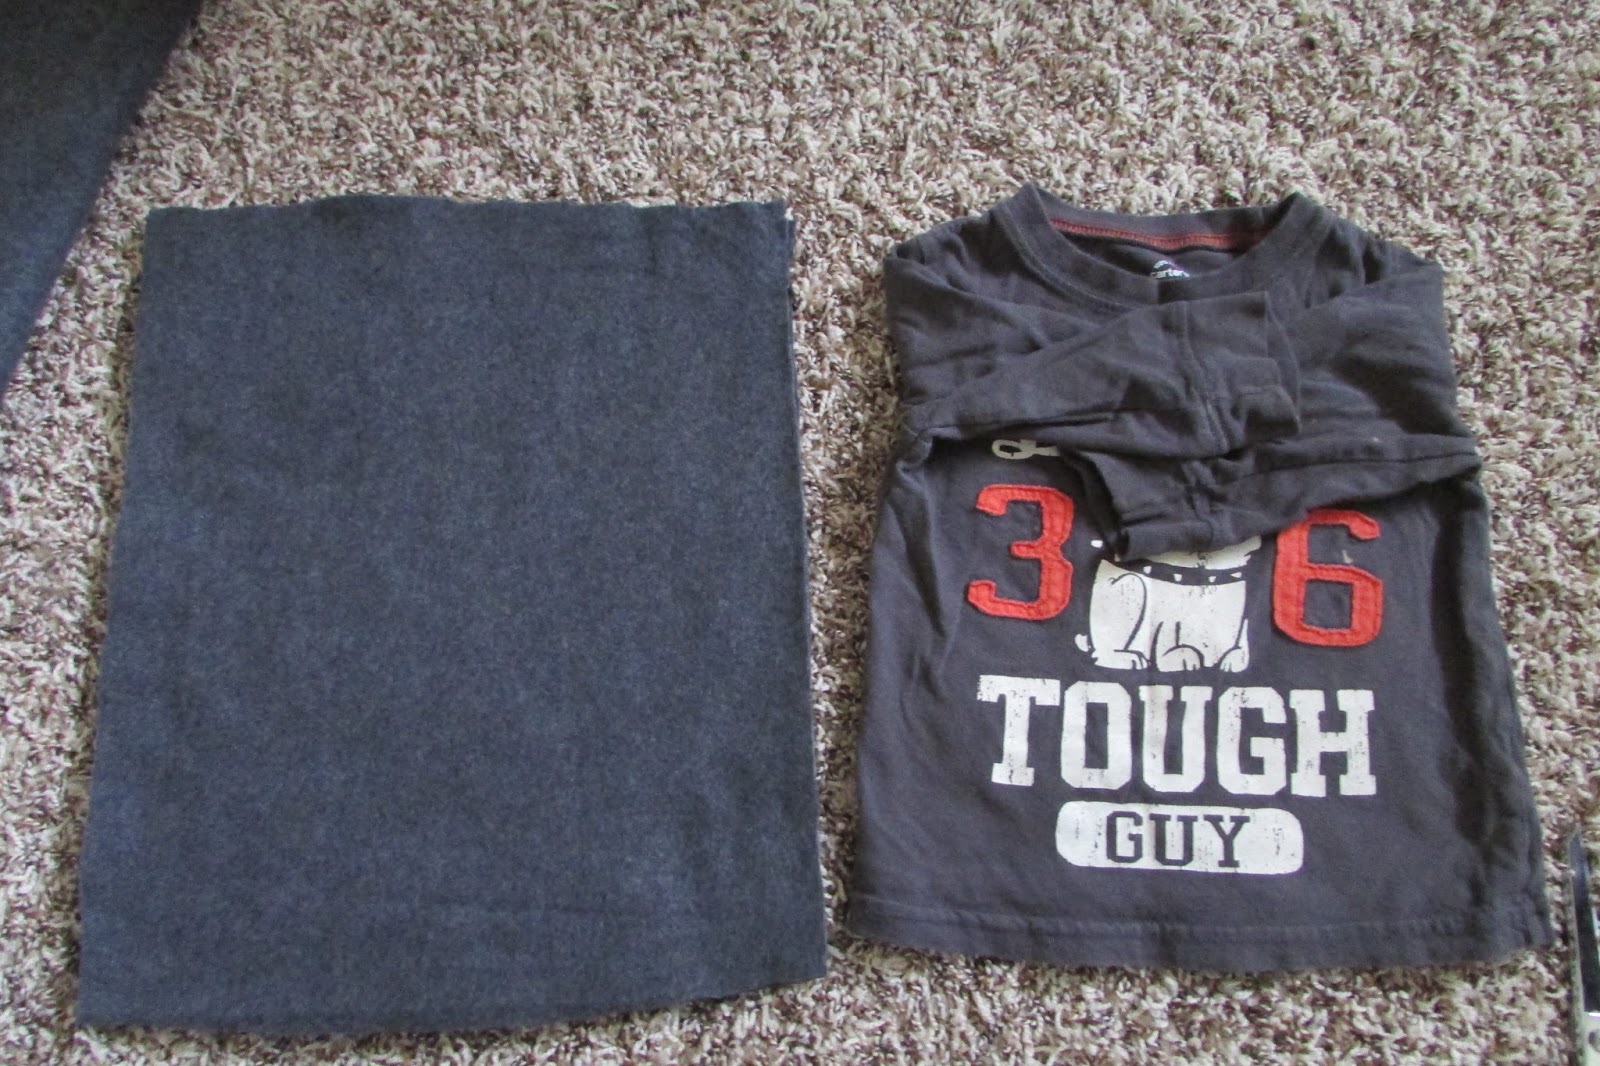
Fold your fabric in half (wrong sides out). I used an existing shirt to help me with the size I would need for a 6-12 month old.  Giving myself some extra room for seams, I very carefully cut out a rectangle a little larger than the size of the shirt.

When all was said and done, I should have cut the fabric a little bit bigger, but this worked.
 With my two rectangles still lying on top of each other, I pinned where the neck and arm holes would be. Again, give yourself a little extra room.
 When you're read to sew, it will look like two rectangles pinned together. DO NOT sew your neck or arm hole openings closed or you'll be sad!
With your body more or less put together, I decided to make a casing along the bottom of the shirt for some elastic so the shirt would be bunched and give the impression of a fat little shark. I used this super easy tutorial from howtosew.com to help refresh my memory on doing this.

 Okay, the basic body of the shirt is just about done! Now to add the shark details. For this next part, we'll be working with the shirt rightsides out. (i.e. NOT inside out).

For the fin: take your gray felt and make a triangle. Cut off excess. Just eyeball what size triangle looks good on your shirt.
 I cut my triangle "on the fold" so only one side needed sewn. Once sewn, turn your triangle so right sides are out (seams hidden). Leave the bottom of your fin open. You'll probably need to use a pencil or something to poke inside your fin to get the point of your fin sticking up straight again.
 Pin fin onto back of shirt. Now comes the dreaded hand sewing. If you know me, you know I absolutely despise hand sewing, but for this, it was a necessary evil. Put in a good movie and get hand sewing!
 Next, I went to work on the hat. I used this fleece hat tutorial from fleece is fun. I used the basic hat pattern. Later, I went back and and made the pumpkin hat for my Little Mr. too! The site has patterns from size baby to adult, so you can be sure you'll find what you need!

Now you're ready to add the shark-face details. You just need a teeny bit of red felt to make some gums and a strip of white for the teeth.
 No more hand-sewing! I love using the glue gun whenever possible! I traced how I wanted the stomach to look on a white piece of felt and glued it on. I should also note that before I did this, I took my sewing scissors and slightly rounded the neck opening on the front side of the shirt. My baby's head fits through so much better! I hot glued the eyes, teeth, and gums too.


Fleece is great to work with because it really doesn't really fray. I am not worried about hemming the raw edges of the hat or around the arm and neck holes of the shirt.
Next Up: The Pirate
  • half yard of black felt (from the bolt not the little squares) for the pirate vest, hat, and eye patch
  • elastic for the eye patch and the hat
  • scrap of red fabric long enough to tie around the waist as a sash
  • I found a foam pirate sword at Wal-Mart for $1.97
  • I used an existing shirt and pants for the costume base.
For the pirate vest, I used this tutorial from danamadeit.com. Super easy and quick!
  •  Follow the directions for the pattern: for the back piece you'll be cutting on the fold (ie.e your fabric is folded in half)
     For the two side pieces, lay the felt on top of each other (no fold needed). Be sure to also fold down that triangle piece on the pattern
     You'll end up with 3 pieces. Just pin them together. Before I sewed, I took my scissors and cut a zig-zag pattern along the bottom to give it a pirate look.
     Sew your pieces together, and then turn right-side out to hide your seams. Easy-peasy vest!
For the pirate hat and eye patch:
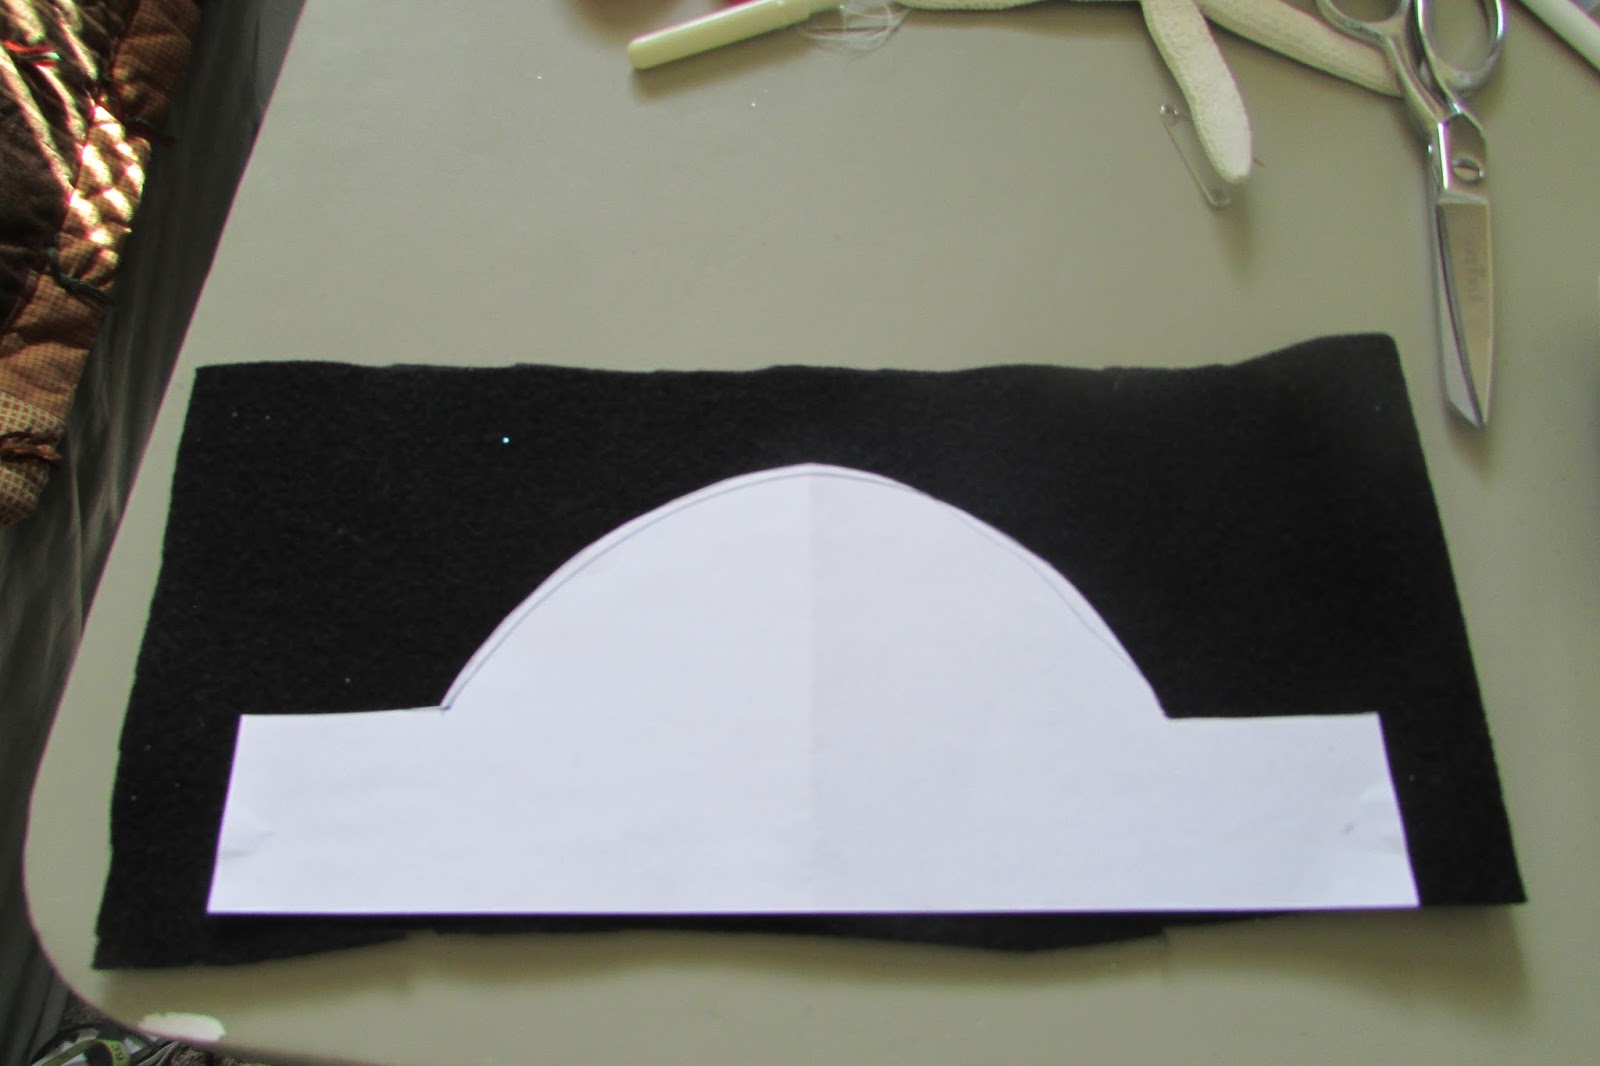
I was originally planning on buying pirate accessories until I realized I had plenty of extra felt left over and no reason not to just make them. I took a piece of white printer paper and just sketched out the basic outline of a hat. I didn't make an actual hat, just the outline and then used elastic. I did cut out two of the hat shapes, sewed the sides (leave an opening on each side for your elastic) and tops together and then flipped it so the seams were hidden.Then, insert elastic on the sides and sew closed.
 Next it was time for the skull and crossbones. I found an image I liked online and printed it out in the size I needed.
 I pinned the image onto a piece of white felt and cut it out.
 Then I cut out the eyes and nose and laid the paper image over the felt one. using a black sharpie, I filled in the eyes and nose and then drew the mouth.
 For the eye patch I traced a circle onto a piece of paper. You'll notice my circle isn't completely round. I made it kind of tear-drop shaped. You'll see why in a minute. I cut out the eye-patch on one piece of felt (so it's not 2-thick)
 I centered the eyepatch over the ends of the elastic. I folded over that extra rectangular piece at the top of the circle so I could sew the felt to the elastic.I just did a circle all the way around the felt and then did an X.
back of eye patch
front of eye patch

 One happy pirate!

Finally: Mermaid Tail
  •  1 yard of green fabric for the tail
  • 1/2 yard of organza fabric for the fins and around the waist
  • elastic for the waist
  • any "under the sea" accessories
  • I used a purple shirt for the costume base, but in the tutorial link there are instructions for using a nude leotard and adding the clam-shell bra detail (my husband would have a heart attack seeing his little girl dressed like that, so we did this instead.)
 For this tutorial I followed two identical tutorials (they link to each other). Even though both tutorials were essentially the same, they both were helpful because I needed lots of pictures to make sure I was doing it right. Hopefully my pictures will help as well. Click HERE for the main tutorial and HERE for the secondary tutorial.

Take your tail fabric and measure out the width and length for your child. Give yourself lots of extra length for putting in the elastic waist. You can always cut off excess later. Keep in mind that you want it straight but not too tight because she'll need to be able to walk and/or wear pants (possibly snow pants) under it for Halloween night. This can be kind of tricky, but my philosophy is its better to have it too big than too small! Sew a seam up the back (wrong sides out). Basically you'll have a long tube.
 From the mid-point at the bottom, cut the tail into a V shape. I tried to get mine as even as possible, but alas it was not to be. Oh well.
 Take your organza fabric for the fins and follow the instructions in the tutorial for sewing them on. To help me think about this, you'll end up with 4 separate fins: two on the front (right and left) and two on the back (right and left) Basically sew the fins on the front side (left and right side) first. To make the fins on the front a little fancier, while pinning, create pleats. Don't forget to have about 2 inches extra hanging off the end toward the toes!
 
after you've done the front, take your scissors and round off that extra 2 inches. This just gives it a more fin-like appearance. For the back fins, again do each fin (right and left side) individually. The tutorial says not to pleat them so I didn't. Although you definitely could. Again, leave two inches extra on the side toward the toes. After you've sewn both side, round off that extra fabric. My biggest regret for this sewing project was not using green thread! I didn't think the white would be too terrible, but it really stands out. So learn from me, buy green thread!

 Here are a couple pictures showing the back fins for reference.
 Once all your fins are done and you've rounded the ends off with scissors, use a lighter to carefully burn the edges so they don't fray.
Front fins with pleats
Now that your fins are done it's time to finish the waist. Have your little mermaid try on the skirt so you can see if it's too long. You want the V part of skirt at about the ankles. Leave yourself about 1-2 inches of extra for the casing for your elastic waist and then cut off the extra. I did not follow the instructions for sewing the elastic in the waist. I am a big believer in sewing the casing for the elastic first because that it was works for me. The way I did it only differs slightly from the original tutorial.

After you've trimmed the length down, fold down the waist of your tail and sew a casing for your elastic. BUT DON"T PUT IN THE ELASTIC YET!  Then, take your remaining organza piece and wrap it around the unfinished waist (i.e. no elastic yet). Pin it in place. I also overlapped the two end pieces in the back  so there were no gaps in the fabric. Once you're ready, sew the organza to the top of the fabric.

Once the organza is sewn to the top of your fabric, you're ready to add your elastic.
 This is what the inside of my skirt looks like with the elastic in it. It was at this point that I took my lighter and burnt the bottom edge of the organza again. The top edge is sewn so you don't need to worry about it fraying.
 Now you're ready to add some details. Find the middle of the waist and gather the organza fabric by pinching it with your thumb and pointer finger. Gather it at the top of the waist--make sure it's centered--and then hand sew in place. Repeat on back side.
You now can add any other details like some kind of sparkly jewel in the center of the waist where its gathered. I love JoAnne's fabric stores. I got all of my materials there, the jewel for the center, and the sea star for the hair clip. I always shop there with their store coupons in hand. I love that you can use more than one coupon (i.e. 50% off a cut of fabric, 50% off one jewelry item, 50% off one item from the floral department) --this entire outfit was less than $10!

A sea star/ seashell headband, hair clip, or necklace would be cute too. I just happened to have a shell necklace I got as a souvenir from Indonesia.I found a pack of 3 sea stars at Joanne's and hot glued the smallest one to an alligator clip. Then I made a small felt flower (it's supposed to represent seaweed. come on, use your imagination!) and glued it on there too. Then, I also found a sparkly green headband in the clearance bin at JoAnne's for 50 cents! I couldn't pass that up!
And Ta-Da we now have a sparkling mermaid!

Happy Halloween 2015!