Monday, December 8, 2014

Christmas Roundup: Holiday Printables & Tutorials


I always go overboard with prints at Christmastime. This year was no exception. There are THREE new prints to choose from. I love prints because they can easily be used as part of your decorations, tables settings, given as gifts, or printed smaller and made into cards or tags for treat plates. They make fabulous teacher gifts too! Here are the new printables for 2014, followed by prints from past years as well as some tutorials to make sure your season is merry and bright! And if you liked this post, please share it on facebook and pinterest too so others can enjoy it. And don't forget to check out my etsy shop too!


For the merry little Christmas print, click HERE
For the come all ye faithful print, click HERE
For the Winter Wonderland print, click HERE

I did a sewing tutorial for a car/crayon holder. Click HERE to see it.

Other Christmas Prints & Tutorials:
Click on the names to download or be redirected to the tutorial
Merry Christmas to all! And Thank you to for supporting my small business through another year! I love doing the freebie printables and tutorials as a way of saying "Thank You!", so keep checking back monthly!

Monday, December 1, 2014

Confessions of a Wannabe Seamstress: DIY Car/Crayon Holder

Has everyone recovered from their turkey coma and/or black Friday shopping?  Since I now have 2 boys, I'm always looking for sewing projects for them. There are tons out there for little girls that I want to do or have done for my own daughter, but now I'm in boy mode.

Since my oldest started school, I have been in the mood to sew during those quiet afternoon hours. My first project is a stocking stuffer for Christmas for my almost three year old son. 

I can remember sitting in church one Sunday while I tried to wrestled with my 18 month old son. I looked over at a family whose son was kneeling on the floor and quietly playing with this matchbox car holder and driving it on a road. I also have an older daughter who recieved a crayon holder from our good friend when she about 2. I loved both those ideas and decided to combine them for my son (who LOVES cars and is just getting interested in coloring). This car/crayon holder is perfect for church, out at a restaraunt, keeping busy at a doctor's office...basically just stash in your purse/diaper bag and pull it out when you need your little one to self entertain for a few minutes.

I found some cute fabric and matching ribbon at JoAnne's. Because I'm still learning to sew, I bought a half yard of each pattern (I knew I'd mess up and need extra). I also needed a single square of felt (but if you have scrap felt around, that works too. You only need a little of that).

 First, the finished prodcut is about 8 inches tall and 15 inches wide. I gave myself an inch of extra hemming space. So I cut all three of the fabrics to 9 inches tall by 16 inches wide.

You'll want to start with sewing the pocket for the cars/crayons to the inside piece of fabric. Take your pocket frabric (in my case, the green) and fold it in half. Iron well to create a nice crease. Then pin the pocket fabric to the bottom half of the larger fabric (see pic below). You'll want the portion of the fabric with the crease at the top and the open ends at the bottom. Sew along the sides and bottom. DO NOT sew the portion of the fabric with the crease!!
 Now it's time to sew the pockets. I measured the pockets to hold 4 matchbox cars and 7 crayons. You can adjust more or less of each size according to your wants. The car pockets are roughly 2 inches wide and the crayon pockets are about 1 inch wide. (side note, I did end up with a really tiny pocket after all my crayon pockets were finished. I should have just made that last pocket a little bigger instead. Oh well, sa la vie! I think it's big enough that it could fit a golf sized pencil or pen)
 Once your pockets are sewn, it's time to sew on the front piece of material. Pin your two large pieces of material together and sew around the edges. You'll want to leave a portion on the bottom (where your pockets are) unsewn so you can 1)turn it rightside out and 2) sew your ribbon in place.
 Once all 4 sides are sewn, turn your fabric rightside out and give it a good iron. Insert your ribbon into the spot you prepared and either handsew the closure shut or use the machine. I didn't measure my ribbon--I just cut plenty of it and will trim it down later.

Now it's time to make the road. I folded the top half down (see picture below) so I could get an idea of where to sew the lines for the road. (I wanted it to be somewhat centered).
 I cut 3 peices of white felt (I didn't measure, just eyeballed what I thought looked good) and pinned them in place. I did a quick line through the felt with my machine.
 And TA-DA you're done!
 And ready to play!
 When you're all done, just roll it up, tie, and pop it in your purse or diaper bag. Neat and tidy and doesn't take up too much space.
I can't wait for my son to receive this in his stocking on Christmas morning. I also made another one as a gift for his cousin. I'm pretty sure any  of my friends with little boys will be getting one too :) These are cute, practical, and can be sewn together in an afternoon.

Monday, November 3, 2014

November Freebie: Giving Thanks

Since this month's focus is on being thankful, I thought I'd try this saying on for size "In everything give thanks" That's hard to do. At least for me it is. Am I always remembering to give thanks? I know I take for granted many things in my life and sometimes even over look those blessings in disguise (you know the ones that make you want to tear your hair out and cry because life is so hard, but then later....you look back and realize it was all for a purpose can see the journey that experience allowed you to have).

I'm going to try to take this message to heart. I hope you do too. And don't forget to share it with others. 

 To download the white version, click HERE
To download the striped version, click HERE

And don't forget there's another holiday just around the corner, too. Check out my etsy shop to see if there's anything that could make your loved one smile this holiday season. And don't forget I design custom Christmas cards. Contact me early via an etsy convo or my email peabeedesigns@gmail.com. 

And coming up in December: a DIY tutorial for a super easy and fun stocking stuffer for any little men in your life! Make sure to check back!

Wednesday, October 1, 2014

Confessions of a Wannabe Seamstress: DIY Frozen Costumes

One year ago I did my first wannabe seamstress post as I undertook my first every sewing project since 7th grade Home Economics. At the end of that post, I mentioned how much fun I had sewing and wanted to do it again. Well, I've finally dusted off the sewing maching (actually, I finally got my own sewing machine instead of bumming off my MIL's) and am ready for round two!

I almost had my daughter convinced that she should be a witch for Halloween this year. With baby #3 due anytime, I'm not sure I'll even feel up to trick or treating. We have all the supplies at home for a witch costume. We went to the store to buy a child's size witch hat and that's where my plan unraveled. My daughter saw her dream costume hanging from a display rack. Three guesses you can get it right. Yep...Elsa. Of course the store didn't have her size and all online searches were fruitless (either they were out too or wanted a small fortune for it). Finally, I said to myself "it can't be that hard" and off to the fabric store I went for inspiration!

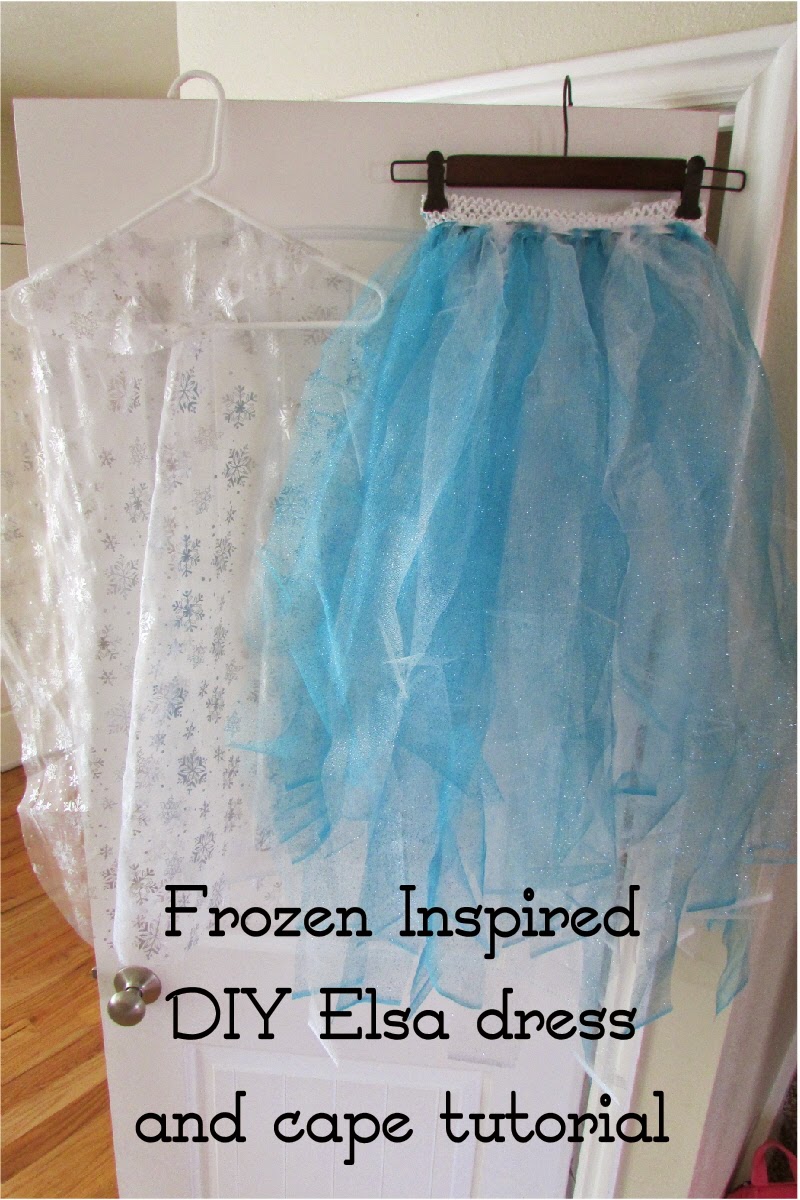
Now, I am not a clothing sewer. So Elsa's dress is my own take on the amount of the work I wanted to put into a costume that will be worn for one night and then stuffed into the dress up box for ocassional use. I also had to keep in mind that it's pretty cold where I live on Halloween, so I had to think about layering and coats. Finally, I tried to use some things that I already had at home.

So here it is:


I used a white shirt my daughter already had for the top of the dress. Underneath the skirt, she'll wear a pair of thick white leggings I found, but really on Halloween night she'll probably be wearing snowpants under it. At the fabric store, I bought 2 yards each of white and blue tulle (the kind my daughter picked out had glitter in it). Then we got a yard of the sheer fabric for the cape. A visit to the dollar store and we found the crown to match. I used some leftover elastic I already had and I was good to go!
 First, keeping your tulle folded in half, lay it out on a good cutting surface. I love cutting things out on my kitchen table because it's tiled and helps keep me from cutting crooked lines ;)

I cut my tulle in 3 inch wide strips.
 Once all your tulle has been cut, unfold it and lay it out. I wanted my Elsa dress to be extra full, so I double layered the tulle. I did a line of 2 blues, a blue/white, a white/blue and then white/white. After I had several done, I laid my elastic across the middle. Measure your child's waist and then cut 1-2 inches (or more if needed) less than that (because it's stretchy). I always put a pin at my cut line and remeasure around the waist before I do any actual cutting just to be sure of my measurements.
 Take the two ends of tulle and just knot them around the elastic, sliding your knotted pieces over as you go.

 See, all that I laid out, only did this much of dress!

 I pinned the end of my elastic so the tulle wouldn't slip off as I pushed it over.
 After lots of tying, I was finally done! You could easily just use the elastic as is, but I bought a yard of headband lace at the store to sew over the top of the bare elastic. It covers your knots, which I liked. Don't forget to sew a quick line where the two ends of the elastic meet to complete the circle.

I used this tutorial from Make It-Love It to the make the cape. It was great! The only thing I changed was I didn't add a train. Since this was for trick or treating I didn't want her to trip on it or anyone else to step on it.


I think this tutu version of Elsa's dress turned out pretty dang cute and you can use these same principles to make all sorts of princess dress up: use green tulle and a purple shirt for the little mermaid or yellow tulle for Belle. You could even do black and orange tulle to make an awesome witch skirt.

Now what's an Elsa without an Olaf? Luckily, I have two year old who will glady play the part. At first I thought his costume would be a snap: white sweats for snowman body and a quick hat to top it off. Apparently, it was not to be--there were no white sweats to be found!! Luckily this tutorial from fabric.com for Olaf's hat and top and this tutorial from danamadeit.com for the bottoms SAVED ME! I'm pretty sure I'll use the top and pants patterns again to make more costumes. I'm already thinking things like have this boy be a fire fighter next year while our new little one debuting this year is the dalmation :)


Pointers for the olaf costume:

  • The tutorial says to use fleece, but I had white flannel on hand, so that is what all 3 pieces are made out of. I used felt for the buttons, teeth, nose, eyes, eyebrows, and hair twigs.
  • I hot glued the eyes and eyebrows on the hat and the buttons on the shirt to save time and effort instead of hand stitching.
  • The nose is two pieces of orange felt measured 3.5 wide and 4 inches tall. It took me a couple tries to get the shape just right (it's not a triangle...more like a rocket shape!). I used my machine to sew it together (leave an opening) and then turned in rightside out, stuffed it, and then hand sewed it on the hat.
  • I just did a front band on my hat (I still am not sure what the back band in the tutorial is for, although if you wanted a snug fit, I was thinking you could easily do a band around the back with an elastic).
  • For my front band: I measured 2 strips of fabric the same width as my hat. They were about 2 to 2.5 inches wide. Then I cut the two strips so they were rounded more like a baseball cap (or newsboys cap). Leaving a space for the teeth, I used the machine to sew the two pieces together, flipped them rightside out, ironed the crease, and then sewed it to the front of the hat. Then, I added the teeth in the space I had left open.


Happy Halloween!


Sunday, September 7, 2014

Holidays Ahead!

Usually I'm pretty anal about celebrating a holiday only during it's appropriate month, but since baby #3 is going to make a debut sometime in the next 7 weeks or so, I have been thinking ahead a little bit. Usually I would dedicate September to something back to school related (and I still might, there's a print I'm dying to do), but instead I'm thinking ahead to my very favorite holiday in October. 

I've seen several different versions of this print flying around, and decided to add a version of my own to the mix. I love this for Halloween and think it would look cute framed, hanging on a door or in a window for Trick or Treaters, or even just set out next to your bowl of candy on the front steps if you're not answering the door that night. There are several different colors to choose from, so hopefully there's one you like too.

 To download the chalkboard print, click HERE
 To download the green print, click HERE
 To download the orange/black print, click HERE
 To download the orange/color print, click HERE
 To download the purple print, click HERE

I was an English major in college and one of my favorite classes I took was my Shakespeare class. I fell in love with Macbeth (the play, not the person....I tend to like the tragedies more) and have always thought some of the quotes from the witches would make great prints to display for Halloween. I should also note, for all you diehard Shakespear fans, that I did do a slight change of the wording. (i.e. I spelled out an abbreviated word, changed thirty one to a number, and eliminated an "and" at the end)
To download the Macbeth subway art, click HERE

Happy Haunting! Don't forget to pin, like, and share this post so others can take advantage of my printables too. My etsy shop is also up and running. I have a few new items and am still taking custom orders, but I'll be limiting the amount of orders and how often I renew items after my new little goblin arrives--so order early!

Find more Halloween posts from me HERE and HERE