Showing posts with label superhero. Show all posts

Wednesday, October 5, 2016

Wannabe Seamstress: DIY Superhero Costumes

 As you probably know, this is my favorite time of year for sewing! It's so fun to do my kids' Halloween costumes each year and each year I learn a little more and add new sewing skills.

 PLEASE NOTE: I am not a professional seamstress. I make many, many mistakes and my goal of these tutorials to help you not make the same mistakes I did and to take those pinterest inspirations (i.e. usually no patterns and sometimes confusing tutorials) and turn them into something that anyone can do. There will probably be things that I do poorly or that you can do better. By all means DO! Improve upon this tutorial and make it your own. Enjoy the journey as you sew and improve. I know I am!

This year, I based my kids' costumes around a 2015 Christmas present my then 3 year old son got. His uncle gave him a really nice Batman costume. It was a little big on him and I knew right then and there that we'd use for Halloween in 2016. I just put him in some warm black pants and black thermal shirt underneath. And YAY--that's one costume down!

And if you have a Batman, you gotta have his trusty side-kick, right?
For the red shirt, I used this tutorial I have used for the past 3 years now (I used the same pattern for Olaf and the Shark)! Seriously, making the sleeveless shirt can be used for any costume you can think of!

Fold your fabric in half (wrong sides out). I used an existing shirt to help me with the size I would need for a 24 month old old.  Giving myself some extra room for seams, I very carefully cut through both pieces of fabric and cut out a rectangle a little larger than the size of the shirt.

 With my two rectangles still lying on top of each other, I pinned where the neck and arm holes would be. Again, give yourself a little extra room.

 When you're ready to sew, it will look like two rectangles pinned together. DO NOT sew your neck or arm hole openings closed or you'll be sad!

In year's past, I've done a casing around the bottom of the shirt and put an elastic in to make the costume for Olaf and the shark more bunchy and the appearance of being more round. I did not do that with this costume.

After I was done sewing, I used a sweater vest I found to help me shape the arm holes a little better than I've done before. I also took my sewing scissors and slightly rounded the neck opening on the front and back side of the shirt so my son's head could fit through!

Then I used some left over felt and made the embellishments for Robin's costume. You could sew them on, but I think you know that if I can use a glue gun to get the job done I will.

Luckily, I had a top from a pair of TMNT jammies he could wear underneath the red shirt for the green sleeves of Robin's costume. But I needed to make a pair of plain green leggings. I scoured pinterest for tutorials and patterns and finally found this one that is seriously THE BEST one out there.
 The only thing I did different than the tutorial was to hem the pant legs last instead of first.
Then, I used this tutorial for the cape (it's the same tutorial I used for the Elsa cape). My little guy didn't love the weight of cape pulling against his neck, so I went back and used safety pins (NOT while he was wearing it!) to pin the shoulders of the cape to the red shirt.


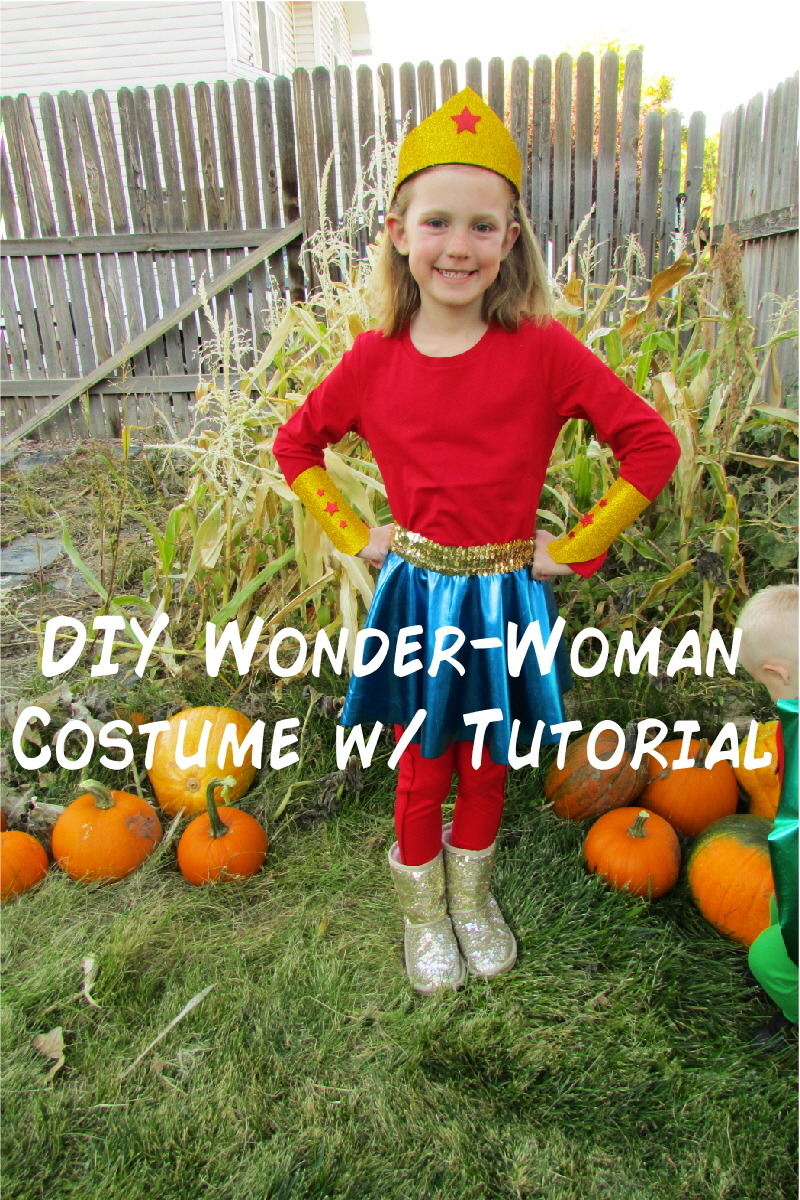
Since I had a Batman and Robin, my mind naturally thought of Cat Woman for my daughter. But that costume isn't very fun. When saw the metallic blue of this fabric and JoAnne's, we decided that Wonder Woman is way more fun!

To do the skirt, I used this tutorial for the circle skirt. I was scared to do it and so worried it wasn't going to turn out, but it did! And now that I know how to make a circle skirt, I plan on making more skirts for my daughter to wear to school and church!

First, you need to make your own pattern by taping/gluing 4 pieces of paper together. Then you need to follow the instructions on the tutorial for figuring out the waist radius and the length. Here's another cheat sheet for figuring out the radius of your quarter circle. 
Once I had the radius marked on my paper, I measured down to the length I wanted the skirt and marked it.
Move your measuring tape around that quarter circle you made (the Radius)  and mark in different spots to get an even length for your skirt.

Then cut out your pattern. Next, fold your fabric into fourths and lay your pattern on top and pin it through all layers of fabric to secure it.
Cut out your fabric on the fold (this is where I had a panic attack, but it turned out fine!):

And TA-DA!!! You are practically finished!

I used this sparkly elastic stuff for the band. Again, I followed the instructions on the tutorial on how to sew it. The only difference was this gold stuff I used was way more stretchy than regular elastic so I had to cut, pin, and have my daughter try the skirt on many times before I got the right fit.


Since this material didn't fray when I cut it, I decided not to hem the bottom (it's a dress up skirt after all). So after sewing on the elastic waist, I was done!

It fit perfectly!

 Since Halloween night is pretty cold where I live, I'll have her wear a pair of red leggings under the skirt. I'm also going to have her wear a red long sleeved shirt with it.

I found some glittery foam 8.5x11 sheets at Wal Mart that worked perfectly to make the crown and wrist cuffs Wonder Woman wears. They didn't have any glittery red foam, but Wal-Mart did carry a set of stickers already cut out into stars.

To make the crown, I first made a pattern on a sheet of white printer paper. WW's crown is pretty basic and not too hard to recreate. After I'd cut out my pattern, I cut out the crown on the gold foam paper. Then I just hot glued it to a headband my daughter already had. TIP: line up the center of the crown with the center of the headband and glue that part first.

I had enough of the foam paper left to do the wrist cuffs too. I just measured two pieces of the foam around my daughter's wrist so the two ends weren't quite touching. I cut one of  each end so they were more tapered against her wrists (see pic below). Then I hot glued two small pieces of elastic (one at the top and bottom of each wrist cuff) so my daughter would be able to get the cuffs over her hand, but they'd still fit snuggly. Last, I attached the red stars to the crown and wrist cuffs, and I was done!
 The kids had tons of fun playing superheros--and that is exactly why I love making costumes for my kids...to use as dress up throughout the rest of the year and to see their imaginations soar!


Check out the other past costume tutorials:
Jessie and Woody from Toy Story
Elsa and Olaf from Frozen

Saturday, February 6, 2016

How to Have a SUPER Party on a Budget

Here's the thing: I love making my kids feel special on their birthdays but I don't want to spend a fortune. I want everything to look cute but don't like to spent a lot of time on things that are just going to be thrown away. Again, I don't want to spend a fortune (or a lot of time for that matter) and this is where party planning on a budget comes in--not a lot of time to set up and prepare, not a lot of money spent either! Win-Win!

My son is obsessed with superheroes. He especially loves Spiderman but loves the other ones too. Knowing this, I set out to plan a SUPERHERO themed 4th birthday party for him and a few of his friends. And since I'm know I'm not the only one with kids who love superheroes, I'm going to tell you exactly what I did and how you can host a successful party for $30 or less!
 This personalized invitation is customizable with several different superheroes to choose from and includes a matching topper for your party favor treats (see the picture at the end of this post). You can order your invitations HERE.
 The spiderman tablecloth was the only superhero themed decoration I bought. (around $3) The rest of the decorations I got out of our tote I keep in storage that has crepe paper, the reusable Happy Birthday Banner, and the banner that is hung above the sliding glass doors.) You could easily print off more superhero pictures to add to existing decorations to match your theme.
 My son invited a few of his little buddies over to our house for his first ever friend birthday party. He was so excited and thought everything was just wonderful and amazing. Makes you feel pretty good as a mom to see that kind of reaction.

When all the kids got to the party, I had them sit on a blanket laid out on the floor and we did a little story time. I read them 2 superhero books I found at our local library. They were super cute and geared toward younger kids. My son and his friends loved them! (cost of books: FREE from library)


Next, the boys played "Pin Spiderman in the Web". Instead of spending money on a premade game, I took 10 minutes (probably less) and made my own. I used a large piece of butcher-type paper from my kids' craft supplies and drew a web. Then I just googled spiderman and found an image I could print out for each guest on cardstock. We used one of my husband's ties as a blindfold. I didn't give a prize to the "winner". It was just a fun game we played. (cost of game: FREE)

 Then I gathered the kids at the table where they made their own superhero mask and shield. I bought the mask set from Oriental Trading for $7.50 (I was able to score free shipping). For the shield I used some cheap paper plates and taped a strip of cardstock on the back to make a handle. The kids colored and decorated their own shield with markers and glued some shapes I had precut out (stars, lightning bolts etc..)


After the craft I let the boys play for a minute in this "obstacle course" I set up in our basement. (My son's birthday is in the middle of winter...for a summer bday an obstacle course outside would be really fun!) I needed a minute to clean up the table and the boys LOVED pretending to be superheroes with their new masks and shields.
Obstacle course aka: go down the slide, climb through the tunnel, climb over the ottoman, touch the wall, and then run back to the beginning. (Cost of obstacle course: FREE)

After the table was cleaned up I called the boys back up for cupcakes
 I had a local bakery make the cupcakes. For a half dozen it was $3.50. I printed the superhero toppers from this site,taped them on toothpicks, and stuck them in the cupcakes myself. It's crazy how having the bakery add some kind of topper to your cake drastically increases the price.
Then it was present time!
Our hour and half was almost up by that point so the kids just played until their parents came to pick them up. On their way out the door they got this personalized party favor. The personalized topper is included with the purchase of your personalized invitation. It fits across the top of a baggie (I used a snack size bag). I filled up each baggie with some M&Ms (around $5 for a large bag) and then stapled the topper to it. That was the only favor we gave out. I figured between this and the mask and shield each kid made, that was pretty good.

And there you have it! We had one happy birthday boy at the end of the day!

Budget Breakdown:
  • Colored Ink (I did have to buy a new ink cartridge but I'm not counting this as part of the party budget because it was something I would have bought for our family regardless and it's not like I used an entire cartridge for the party anyway)
  • Pack of white card stock to print the invites (2 on a page) party favor toppers (3 on a page) and sheet of superhero cupcake toppers, and  spiderman for game--this was less than $5 at WalMart and I have plenty of cardstock left over for other projects.
  • Cupcakes--for a half dozen it was $3.50 at our local bakery. Obviously you could make them yourself for cheaper. Decorating the cupcakes could be one of your activities too! But for 4 year olds, I decided against it.
  • Printable Invites and Party Favor Toppers--$10 for personalized invite and a personalized ThankYou favor topper found HERE
  • Large bag of M&Ms for Thank You party favors -around $5
  • Spiderman Tablecloth around $3 
  • Make your own superhero mask craft $7.50
  • Pin Spiderman in his web, superhero shield craft, superhero books to read, obstacle course: FREE