Showing posts with label kids. Show all posts

Wednesday, October 5, 2016

Wannabe Seamstress: DIY Superhero Costumes

 As you probably know, this is my favorite time of year for sewing! It's so fun to do my kids' Halloween costumes each year and each year I learn a little more and add new sewing skills.

 PLEASE NOTE: I am not a professional seamstress. I make many, many mistakes and my goal of these tutorials to help you not make the same mistakes I did and to take those pinterest inspirations (i.e. usually no patterns and sometimes confusing tutorials) and turn them into something that anyone can do. There will probably be things that I do poorly or that you can do better. By all means DO! Improve upon this tutorial and make it your own. Enjoy the journey as you sew and improve. I know I am!

This year, I based my kids' costumes around a 2015 Christmas present my then 3 year old son got. His uncle gave him a really nice Batman costume. It was a little big on him and I knew right then and there that we'd use for Halloween in 2016. I just put him in some warm black pants and black thermal shirt underneath. And YAY--that's one costume down!

And if you have a Batman, you gotta have his trusty side-kick, right?
For the red shirt, I used this tutorial I have used for the past 3 years now (I used the same pattern for Olaf and the Shark)! Seriously, making the sleeveless shirt can be used for any costume you can think of!

Fold your fabric in half (wrong sides out). I used an existing shirt to help me with the size I would need for a 24 month old old.  Giving myself some extra room for seams, I very carefully cut through both pieces of fabric and cut out a rectangle a little larger than the size of the shirt.

 With my two rectangles still lying on top of each other, I pinned where the neck and arm holes would be. Again, give yourself a little extra room.

 When you're ready to sew, it will look like two rectangles pinned together. DO NOT sew your neck or arm hole openings closed or you'll be sad!

In year's past, I've done a casing around the bottom of the shirt and put an elastic in to make the costume for Olaf and the shark more bunchy and the appearance of being more round. I did not do that with this costume.

After I was done sewing, I used a sweater vest I found to help me shape the arm holes a little better than I've done before. I also took my sewing scissors and slightly rounded the neck opening on the front and back side of the shirt so my son's head could fit through!

Then I used some left over felt and made the embellishments for Robin's costume. You could sew them on, but I think you know that if I can use a glue gun to get the job done I will.

Luckily, I had a top from a pair of TMNT jammies he could wear underneath the red shirt for the green sleeves of Robin's costume. But I needed to make a pair of plain green leggings. I scoured pinterest for tutorials and patterns and finally found this one that is seriously THE BEST one out there.
 The only thing I did different than the tutorial was to hem the pant legs last instead of first.
Then, I used this tutorial for the cape (it's the same tutorial I used for the Elsa cape). My little guy didn't love the weight of cape pulling against his neck, so I went back and used safety pins (NOT while he was wearing it!) to pin the shoulders of the cape to the red shirt.


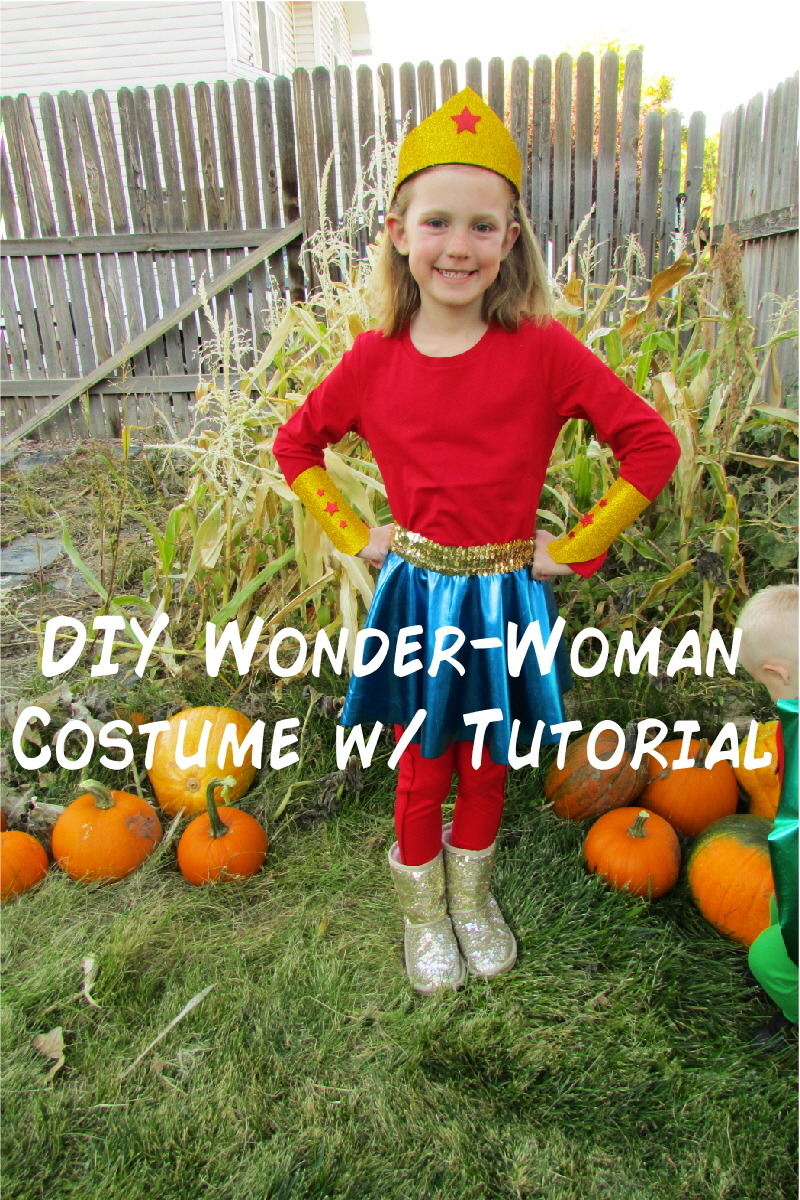
Since I had a Batman and Robin, my mind naturally thought of Cat Woman for my daughter. But that costume isn't very fun. When saw the metallic blue of this fabric and JoAnne's, we decided that Wonder Woman is way more fun!

To do the skirt, I used this tutorial for the circle skirt. I was scared to do it and so worried it wasn't going to turn out, but it did! And now that I know how to make a circle skirt, I plan on making more skirts for my daughter to wear to school and church!

First, you need to make your own pattern by taping/gluing 4 pieces of paper together. Then you need to follow the instructions on the tutorial for figuring out the waist radius and the length. Here's another cheat sheet for figuring out the radius of your quarter circle. 
Once I had the radius marked on my paper, I measured down to the length I wanted the skirt and marked it.
Move your measuring tape around that quarter circle you made (the Radius)  and mark in different spots to get an even length for your skirt.

Then cut out your pattern. Next, fold your fabric into fourths and lay your pattern on top and pin it through all layers of fabric to secure it.
Cut out your fabric on the fold (this is where I had a panic attack, but it turned out fine!):

And TA-DA!!! You are practically finished!

I used this sparkly elastic stuff for the band. Again, I followed the instructions on the tutorial on how to sew it. The only difference was this gold stuff I used was way more stretchy than regular elastic so I had to cut, pin, and have my daughter try the skirt on many times before I got the right fit.


Since this material didn't fray when I cut it, I decided not to hem the bottom (it's a dress up skirt after all). So after sewing on the elastic waist, I was done!

It fit perfectly!

 Since Halloween night is pretty cold where I live, I'll have her wear a pair of red leggings under the skirt. I'm also going to have her wear a red long sleeved shirt with it.

I found some glittery foam 8.5x11 sheets at Wal Mart that worked perfectly to make the crown and wrist cuffs Wonder Woman wears. They didn't have any glittery red foam, but Wal-Mart did carry a set of stickers already cut out into stars.

To make the crown, I first made a pattern on a sheet of white printer paper. WW's crown is pretty basic and not too hard to recreate. After I'd cut out my pattern, I cut out the crown on the gold foam paper. Then I just hot glued it to a headband my daughter already had. TIP: line up the center of the crown with the center of the headband and glue that part first.

I had enough of the foam paper left to do the wrist cuffs too. I just measured two pieces of the foam around my daughter's wrist so the two ends weren't quite touching. I cut one of  each end so they were more tapered against her wrists (see pic below). Then I hot glued two small pieces of elastic (one at the top and bottom of each wrist cuff) so my daughter would be able to get the cuffs over her hand, but they'd still fit snuggly. Last, I attached the red stars to the crown and wrist cuffs, and I was done!
 The kids had tons of fun playing superheros--and that is exactly why I love making costumes for my kids...to use as dress up throughout the rest of the year and to see their imaginations soar!


Check out the other past costume tutorials:
Jessie and Woody from Toy Story
Elsa and Olaf from Frozen

Monday, December 7, 2015

Making Christmas Magical: 12 Days of Christmas activities for families

I am not one of those moms who usually goes "all out" on holidays. I have lots of good intentions, but very little follow through. But this year is going to be different! I wanted to find some activities that didn't require any specialty-store ingredients and required little prep time. Basically, I wanted something for my preschooler & first grader to do in the days leading up to Christmas--especially those days when there's no school!

I originally saw this idea HERE on katherinemaries.com, but I ended up coming up with some new days of my own and taking/deleting some activities the site suggested. I found a ton of ideas on pinterest (so if some of the crafts or activities don't immediately make sense, just type them in the search bar on pinterest) and I especially loved all the paper plate crafts I found on this site .

The ideas printed on each card are suggestions of things my kids and I can do, but I'm not expecting to get them all done. We'll just pick and choose what works best for us. Also, I hate the idea of constantly having to get online to look for recipes/craft ideas so I included pictures of the crafts and recipes right on the cards. And lastly, there's not right or wrong order for these 12 days! I might let my kids pick a card each day or I'll pick one that fits with whatever else we have that day.

Simple, fun ideas for everyday moms and kids.
This would even make a cute neighbor gift! 

These print on a regular sheet of printer paper or cardstock. Just cut down the middle after printing. Besides the cards, you'll need basic art supplies and a stack of cheap paper plates if you're doing the paper plate crafts. I also own most of the videos/books suggested but you should be able to find them at your local library and on netflix/amazon prime video.

Here are some of our activities for Mr. Grinch Day. We invited two neighbor friends to join us today. We started by reading How the Grinch Stole Christmas by Dr. Seuss. Then, we made our a Grinch craft out of paper plates.
 Next, the kids helped me bake "grinch cookies" They each took turns putting the ingredients into the bowl. They especially loved seeing the dough turn green. For my favorite chocolate chip cookie recipe, go HERE
 While the cookies were baking I turned on the classic, cartoon version of How the Grinch Stole Christmas. When the movie was over I called them over to the table for their snack. The picture of the cookies looks washed out, but trust me, with 10 drops of green food coloring, they were plenty green!


 For dinner that night I made "grinch rolls" However, dying the roll dough didn't make them green...more like a white and green marble...which the kids still thought was cool. Click HERE for my tried and true roll recipe.
 We also ate "Who Stew" aka Chili. I told my kids this is what the Who's from Whoville eat for dinner rather than saying the stew was made out of Who's (yuck!) And click HERE for our all time favorite chili recipe.

 This was a easy, fun day and my kids can't wait for us to do another activity day soon!
And that's the beauty of these "days" If you get overwhelmed easily, like I do, spread the days out so you're not necessarily doing one every day for 12 straight days. Choose what works best for your family.
 To download the GRINCH & NATIVITY DAY, click HERE
 
To download the AROUND THE WORLD and REINDEER DAY, click HERE
Just a side note on this day: you might be wondering why the heck my kids will learn how to say merry Christmas in Indonesian. My in-laws served a mission there for our church so Indonesia is regularly talked about at our house.
To download the St.NICHOLAS DAY and CHRISTMAS TREE DAY, click HERE
To download CANDY CANE DAY and ELF DAY, click HERE
To download the CHRISTMAS KINDNESS DAY, and POLAR EXPRESS DAY, click HERE
To download the FROSTY DAY and GINGERBREAD DAY, click HERE

These printables are for personal use only. Please don't use them commercially in any form.

Don't forget to check out my ETSY SHOP to see if there's anything that will make your holiday bright! And please feel free to like, share, and pin this post! Word of mouth really helps my small business out. I also do custom orders, email or send me a convo on etsy to get started! Thanks for stopping by!

Wednesday, December 2, 2015

Confessions of a Wannbe Seamstress: Lined Flannel PJ Tutorial

 It's been a long standing tradition in my family to get pajamas on Christmas Eve. Growing up in a family of five children, this often meant our pajamas were made by my mother. One year we we even got lap quilts (or TV watching quilts) to go with our PJs. As I've begun my own sewing journey I realize now just what a labor of love it was for my mother to sew five pairs of pajamas in different sizes and patterns.

Now that I've started my own family I've incorporated this same tradition with my children. In fact, pajamas on Christmas Eve was a tradition in my husband's family too! In years past, we've bought our kids PJs, but this year I decided to make them. And let me tell you, it was so simple! Depending on the size of the PJs I could get 1-2 pairs done in an afternoon while my son took his nap and my older two were at school. I loved doing this so much, I even made a fourth pair for my nephew.
Let's get started! Around Thanksgiving, JoAnne Fabrics has seriously crazy sales on their flannel. I got flannel for 75 % off! That was only a little over a $1 per yard. I bought a yard of fabric for each pair of PJs I made. Also, these are lined with flannel too to make them extra warm and cozy. So I bought a yard of white flannel for each pair too.You'll also need elastic for the waist.

For the basic pattern I used this pattern and tutorial from danamadeit.com. I printed the pattern out (it's sized for a 3 year old) so for the other sizes, I used an existing pair of pajama pants to make the pattern longer/shorter. I found the waist size and the leg width to be good for the sizes I made: a child's 6x, 4T, 24 months, and 12 months. The waist size was good because once you add the elastic for that specific size, it will cinch up to the right size.

First, print and cut out the pattern and tape it together. If you're making a size bigger/smaller then have a pair of pants on hand to see how much bigger/smaller you need to cut the length. TIP: leave PLENTY of extra length for folding the waist over and hemming the bottoms. You can always cut off excess later. If you're making a pair for a larger child that needs extra width on the pattern, just use your existing pair of PJs as a guide and trace around it. Just be sure to give yourself extra room for sewing your seams. In my case, I always give myself LOTS of extra room... I tend to sew pretty wide seams.

Since these are lined, you'll need to cut out a set of front and back pieces on white flannel and a set of front and back pieces on your patterned flannel--so you'll have a total of 8 pieces cut out (or 4 sets). Again, if you're making you're own pattern look how the original pattern has a slight angle on the waist of the front pieces. This gives the pants a better fit.
After your pieces are cut out, you'll need to turn them so right sides are together and sew along the curved part from the waist to that little point in the bum. TIP: after I've sewed this part, I lay the pieces flat on my machine and do a zig-zag stitch right through the seam I just sewed. I figure these PJs are for kids and this area is the bum/crotch area and is going to see lots of running, jumping, climbing, and crawling around on the floor. I like to reinforce them so they'll be as sturdy as possible.
 8 pieces become 4 So now you'll have your 4 main pieces to work with.
 Find your front and back pieces (the front pieces will have a slightly dipped waist) in the white and pattern and match them up. You'll pin them wrong sides together (right sides facing out)
 The easiest way to pin is to start with the crotch. Line the crotch of each piece up, pin it, then pin the inner legs. Then I pin the corners up by the waist and then down the outer legs.
 Start sewing the inner leg first in one continuous line. Then sew along the waist. Finally, sew each side of the outer leg. I don't sew the very bottoms of the legs because that's the part I'll cut off to adjust for length. I do another zig-zag stitch from crotch to waist to help reinforce the two layers of flannel. Now your 4 pieces just became 2.
 2 pieces become 1: Now you'll pin your two pieces wrong sides together. again, line up the crotch and pin there. then the inner leg. then the two points on the sides of the waist and finally the outer legs.
 Sew starting with the inner leg so it's one continuous line. Then sew up the outer legs. DON'T SEW from the crotch up to the waist in this step or around the waist or you'll sew your PJs together!!! I do sew a zig-zag stitch along the leg seams to help reinforce and this also keeps the edges from fraying. Once everything is sewed, turn them right side out and give it a good iron. They're starting to look like PJs already and don't they feel so soft and cozy? The two layers of flannel really make a difference.
 Now for the waist. I do this by making a casing. You can see a tutorial here. After the elastic is in, I sewed around the unfinished edges of the casing with a..you guessed it...zig-zag stitch to prevent fraying.
 Finally, hem your pants. This is where you can cut off any excess length (remember, leave it slightly long so you can still hem them. I also a little bit extra length beyond that so the kids can wear them longer and to foresee any shrinking from washing. Pin your hem to the length you want. Then I iron my crease before I sew. After, I did another zig-zag stick around the hem to prevent fraying.
And Ta-Da your're done! Sadly I don't have any pictures of little ones modeling them because these are for Christmas. But they all turned out so cute and I can't wait to give these to them on Christmas Eve! I'll probably find some inexpensive thermal jammie-type shirts at Wal-Mart or KMart to finish the set.
Don't forget to check out my ETSY SHOP to see if there's anything that will help you this holiday season. And feel free to like, share, and pin this post. Word of mouth really helps my small business. Thanks for stopping by!