Thursday, November 17, 2016

Thanksgiving Blessing FREEBIE PRINTABLE

It's Thanksgiving time! Holy cow, this year has FLOWN by! And every time we get to Thanksgiving, I'm reminded more and more why it's my favorite holiday: it's about pausing for a moment to appreciate what we have.

 I ran across a quote that said "Gratitude means what we have is enough". I loved it because I feel like it's so true! This time of year we're bombarded with sales and the idea that we need more stuff. I love that Thanksgiving isn't about presents or expectations or a dollar amount...it's about surrounding myself with the people I love and giving thanks to God for all I have, because what I have is enough. 

I hope you enjoy these freebie thanksgiving printables!

 For the colored version of the Thanksgiving Blessing click HERE
 For the wood farmhouse version of the Thanksgiving blessing, click HERE
For more free fall and Thanksgiving printable, click HERE

Wednesday, October 5, 2016

Wannabe Seamstress: DIY Superhero Costumes

 As you probably know, this is my favorite time of year for sewing! It's so fun to do my kids' Halloween costumes each year and each year I learn a little more and add new sewing skills.

 PLEASE NOTE: I am not a professional seamstress. I make many, many mistakes and my goal of these tutorials to help you not make the same mistakes I did and to take those pinterest inspirations (i.e. usually no patterns and sometimes confusing tutorials) and turn them into something that anyone can do. There will probably be things that I do poorly or that you can do better. By all means DO! Improve upon this tutorial and make it your own. Enjoy the journey as you sew and improve. I know I am!

This year, I based my kids' costumes around a 2015 Christmas present my then 3 year old son got. His uncle gave him a really nice Batman costume. It was a little big on him and I knew right then and there that we'd use for Halloween in 2016. I just put him in some warm black pants and black thermal shirt underneath. And YAY--that's one costume down!

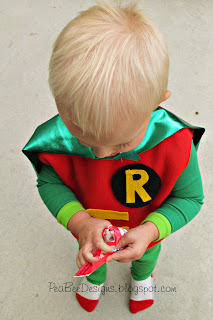
And if you have a Batman, you gotta have his trusty side-kick, right?
For the red shirt, I used this tutorial I have used for the past 3 years now (I used the same pattern for Olaf and the Shark)! Seriously, making the sleeveless shirt can be used for any costume you can think of!

Fold your fabric in half (wrong sides out). I used an existing shirt to help me with the size I would need for a 24 month old old.  Giving myself some extra room for seams, I very carefully cut through both pieces of fabric and cut out a rectangle a little larger than the size of the shirt.

 With my two rectangles still lying on top of each other, I pinned where the neck and arm holes would be. Again, give yourself a little extra room.

 When you're ready to sew, it will look like two rectangles pinned together. DO NOT sew your neck or arm hole openings closed or you'll be sad!

In year's past, I've done a casing around the bottom of the shirt and put an elastic in to make the costume for Olaf and the shark more bunchy and the appearance of being more round. I did not do that with this costume.

After I was done sewing, I used a sweater vest I found to help me shape the arm holes a little better than I've done before. I also took my sewing scissors and slightly rounded the neck opening on the front and back side of the shirt so my son's head could fit through!

Then I used some left over felt and made the embellishments for Robin's costume. You could sew them on, but I think you know that if I can use a glue gun to get the job done I will.

Luckily, I had a top from a pair of TMNT jammies he could wear underneath the red shirt for the green sleeves of Robin's costume. But I needed to make a pair of plain green leggings. I scoured pinterest for tutorials and patterns and finally found this one that is seriously THE BEST one out there.
 The only thing I did different than the tutorial was to hem the pant legs last instead of first.
Then, I used this tutorial for the cape (it's the same tutorial I used for the Elsa cape). My little guy didn't love the weight of cape pulling against his neck, so I went back and used safety pins (NOT while he was wearing it!) to pin the shoulders of the cape to the red shirt.


Since I had a Batman and Robin, my mind naturally thought of Cat Woman for my daughter. But that costume isn't very fun. When saw the metallic blue of this fabric and JoAnne's, we decided that Wonder Woman is way more fun!

To do the skirt, I used this tutorial for the circle skirt. I was scared to do it and so worried it wasn't going to turn out, but it did! And now that I know how to make a circle skirt, I plan on making more skirts for my daughter to wear to school and church!

First, you need to make your own pattern by taping/gluing 4 pieces of paper together. Then you need to follow the instructions on the tutorial for figuring out the waist radius and the length. Here's another cheat sheet for figuring out the radius of your quarter circle. 
Once I had the radius marked on my paper, I measured down to the length I wanted the skirt and marked it.
Move your measuring tape around that quarter circle you made (the Radius)  and mark in different spots to get an even length for your skirt.

Then cut out your pattern. Next, fold your fabric into fourths and lay your pattern on top and pin it through all layers of fabric to secure it.
Cut out your fabric on the fold (this is where I had a panic attack, but it turned out fine!):

And TA-DA!!! You are practically finished!

I used this sparkly elastic stuff for the band. Again, I followed the instructions on the tutorial on how to sew it. The only difference was this gold stuff I used was way more stretchy than regular elastic so I had to cut, pin, and have my daughter try the skirt on many times before I got the right fit.


Since this material didn't fray when I cut it, I decided not to hem the bottom (it's a dress up skirt after all). So after sewing on the elastic waist, I was done!

It fit perfectly!

 Since Halloween night is pretty cold where I live, I'll have her wear a pair of red leggings under the skirt. I'm also going to have her wear a red long sleeved shirt with it.

I found some glittery foam 8.5x11 sheets at Wal Mart that worked perfectly to make the crown and wrist cuffs Wonder Woman wears. They didn't have any glittery red foam, but Wal-Mart did carry a set of stickers already cut out into stars.

To make the crown, I first made a pattern on a sheet of white printer paper. WW's crown is pretty basic and not too hard to recreate. After I'd cut out my pattern, I cut out the crown on the gold foam paper. Then I just hot glued it to a headband my daughter already had. TIP: line up the center of the crown with the center of the headband and glue that part first.

I had enough of the foam paper left to do the wrist cuffs too. I just measured two pieces of the foam around my daughter's wrist so the two ends weren't quite touching. I cut one of  each end so they were more tapered against her wrists (see pic below). Then I hot glued two small pieces of elastic (one at the top and bottom of each wrist cuff) so my daughter would be able to get the cuffs over her hand, but they'd still fit snuggly. Last, I attached the red stars to the crown and wrist cuffs, and I was done!
 The kids had tons of fun playing superheros--and that is exactly why I love making costumes for my kids...to use as dress up throughout the rest of the year and to see their imaginations soar!


Check out the other past costume tutorials:
Jessie and Woody from Toy Story
Elsa and Olaf from Frozen

Wednesday, September 21, 2016

Confessions of a Wannabe Seamstress: 20 Min Table Runner

I have a new obsession: making table runners! I love that these are SO SIMPLE to make, can easily be done in 30 minutes or less, and are the perfect size! They're just big enough to be a focal point on your table, but not so huge that they take up your whole table when you want to use it: like homework time (you could even leave them on for dinner!)

Once a year our church does a huge craft/project day called "Super Saturday". All the women get together and spend the day rotating around stations set up for different projects. These table runners were one of the stations at this year's Super Saturday. My friend taught me how to make them, and she learned how to make them from her mom who learned how from a craft segment on a TV show.

My friend who was teaching had TONS of table runners she had made using this pattern. She had one for every holiday and we talked about how these would make cute christmas/birthday/housewarming gifts. Table runners are such a fun way to add a pop of color to your home and buying them at the store can get expensive. I'm so excited to make more for everyday use that I can rotate throughout the year.

Materials Needed:

  • 1/2 yard of fabric that will be your bottom and top trim
  • 1/3 yard of fabric that will be the top pattern
  • 2 buttons
First, if you have a large cutting mat and a rotor cutting tool, measure the width of of your fabric to make sure it's even (you'd be surprised how fabric gets cut all wonky and are wider in some spots.) Your 1/3 yard of fabric should be 12 inches wide. Use a rotor cutting tool to trim off any spots that aren't straight and are too wide in spots. Your 1/2 yard of fabric should be 18 inches wide. NOTE: If you don't have a cutting mat or rotor cutter borrow one from a friend (that's what I did) or you can use a measuring tape or yard stick as a guide, but it's a little trickier that way.

After your fabric is trimmed, iron the creases.

Next, with the right sides of the fabric together, pin the left edges of your fabric together--along the length.
Using a 1/4 inch seam, sew a straight line along where you pinned.

Now pull the top piece over and pin the right side along the length. Sew that edge.
After it's sewed together, flip it right-side out. You'll have a long tube. Try to adjust the trim pieces so they're even on each side, then iron the creases. (Starch helps with getting your seams to look really nice)
Now fold your fabric in half lengthwise (or if you're my middle school student I would say "hot dog") so your top piece is facing out. Pin the open edges (along the width) together.
Using a 1/4 in seam (see NOTE) sew those pieces together on both ends.

NOTE:
When sewing this I always line up the "tag" ends on both pieces of fabric together. You'll need to sew a little further in than 1/4 inch. Then, once it's sewed, I'll trim off the excess pieces so my seam isn't so big underneath.

Once that's sewed it will look something like this:
Now just flip the end pieces inside out to make your points and iron your seams.
Last, use your machine or hand sew the buttons on your runner. Or if that's not your thing, you can always use a glue gun!
Enjoy your new table runner!
Seriously, these are so quick and easy you'll want to run out and get more fabric, so make sure to have plenty on hand!


Tuesday, August 2, 2016

August Freebie: The Mountains Are Calling

We've been having so much fun this summer, I've neglected my designs and the 'ol blog. But I'm back and ready to get to work! With school starting and fall approaching, I've got loads of ideas for new designs and new products to feature in my etsy shop.

This month's printable celebrates everything I LOVE about summertime. We're fortunate enough to live close the mountains and heading out to boat on the lake, roast s'mores in a meadow, camp, hike, and fish are just a short drive away. I hope you're all enjoying summer and soaking up every last minute of it until school starts again (for us, it's in a few weeks--bleh!)

This printable is perfect for the family who loves the outdoors and would be so cute framed on a collage wall or display featuring pictures of your family's adventures. Or in an outdoor themed room. Print a small version to use as a tag or card. 

To download the mountains are calling printable, click HERE

Please help me spread the word that my designs and shop are back from summer break by pinning, liking, and sharing this post! Don't forget to check out my etsy shop to see if there's anything to make your summer really great! I love custom orders--announcements, party invitations, special event invitations, holiday cards...I can do it all! Send me a convo on etsy, message me on facebook, or email me for more details!

Saturday, May 14, 2016

Teacher Appreciation: What Teachers Really Want & Free Printable!

It's that time of year when students and teachers rejoice! The school year is coming to a close and while teachers may seem like the pillars of responsibility, trust me, they are just as excited for the year to be over as the kids. And it's not because they had a horrible year or hated their job. Teaching is exhausting! Teacher is hard work--physically and mentally. In my eight years of teaching experience, I put so much time, energy, and creativity into preparing lessons, teaching them, and grading papers that  by the time May rolled around, I was ready for a break!

Teachers teach because they love kids. Even if you were a parent who struggled to get along with your child's teacher this year, I still believe they should be thanked. Don't end the year on bad terms and use your experience as a learning one. (Side note: I would LOVE to talk to parents of my old students who argued with me about how perfect their student was and it was my fault their homework "got lost". I honestly believe that most of them would apologize and probably realized that it wasn't my fault after-all).

I'm sure we've all seen those cute crayon wreaths or pencil bouquets floating around as ideas for teacher gifts. Here's a tip: Teachers don't want those! Sorry, but it's the truth. We also don't want any school supplies at the end of the year. Save those for the beginning or maybe Christmastime when our supplies are running low. Instead, try some of these teacher appreciation ideas:

The number one thing I wanted from my students was this: A heartfelt note or fun questionnaire filled out by them (for my favorite questionnaire for younger students, click HERE). If your student can't write independently, help them, but otherwise the student should write it. Have them talk about their favorite activity, what they learned, and anything else that stuck out in their mind. I have kept all of my notes from students like this and they mean so much to me and are a fun reminder of past students over the last 8 years.

Other fun ideas that teachers really want: a gift card to somewhere to buy a treat. It doesn't have to be expensive. I once got a $5 gift card to Wendy's and it made my day! Gift cards to places like Sonic to buy a fun soda is also appreciated. Once a student asked me what my favorite treat was and on the last day of school she brought me a Dr. Pepper and a candy bar. I loved that she remembered!

Don't get caught up in the idea that your gift has to be crafty, grand, or expensive. When all else fails, a simple THANK YOU from your student to your teacher is greatly appreciated. The last few weeks of school are full of craziness, it's always nice when a student stops and remembers to say a verbal thank you.

NOW ON TO THE PRINTABLE:
I went to an education conference in April and one of the speakers shared this quote. I loved it! Teaching is such a selfless profession and I thought any teacher would love this reminder. Of course, the quote goes perfectly with a candle. This print is sized as a 4x6 and prints 2 on a page--so it's small enough to easily tape or glue onto the jar of a candle.
 
To download the quote, CLICK HERE

Teacher's will love being reminded of this beautiful saying on hard teaching days. A candle makes a great gift because the teacher can take it home or leave it in the classroom (although teachers shouldn't light candles at school, someone having an open candle near my desks helps relieve me of that stinky smell my room gets).

Don't forget to check out my shop to see if there's anything else that teachers in your life might enjoy! And as always, if you liked this post please LIKE, SHARE, and PIN. Thanks for stopping by!

Thursday, April 21, 2016

2016 Mother's Day Printables

It's funny how life brings you around full circle.

As a child, I was raised by two loving parents and have very fond memories of family trips and outings, family dinners, homemade Christmas cookies and PJs, and all the other kinds of ups and downs that come from living in a household full of 2 adults and 5 children.

However, when I became a teenager, I was terrible to my mother! Simply horrid! I thought I got the short end of the stick on a lot of things and wasn't afraid to let my mom know about it.

Now, I am an adult. I'm married. And I have three children of my own and guess what? Being and adult is hard! Being married is hard! And especially being a parent is hard! I suddenly have this new appreciation for my mother and all the meals she made for us. I know now why I didn't play soccer as a kid (my oldest is in soccer now and dragging the younger two to practices by myself is a pain in the butt!). I understand why I couldn't always have the newest and best toys/gadgets there were.

And so mom, the the printable this month is for you!


To download this printable, CLICK HERE

Aren't the floral watercolor embellishments amazing? I wish I could take credit for those, but they came from a very talented shop called DLOLLEYS HELP.

This printable is truly a tribute to any woman in your life who has touched you. It would be wonderful framed, or could be printed smaller to use as a card or tag. Remember to check out my shop and see if there's anything else mom might like! Remember that I take custom orders as well. Thanks for stopping by!

Check out some of our other Mother's Day Printables HERE and HERE

Wednesday, March 9, 2016

Celebrate Spring with free printables and craft tutorials!


 Spring has finally made its appearance and it's a happy day! I'm soaking up the sunshine and want to surround myself with fresh air and bright colors.

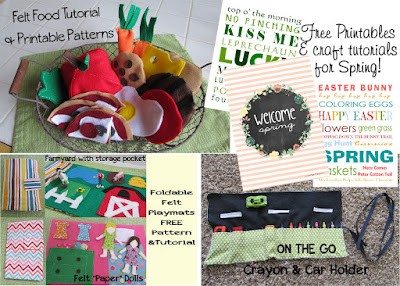
And this months has a lot going on! It's St. Patrick's Day, Easter, and Spring Break for my kiddos. It's been no secret that I enjoy sewing things for my kids and I've made it a tradition to put something homemade in their Easter baskets that's from mom and not the Easter Bunny. The ideas I've shared are from year's past and they are easy projects that can be done in an afternoon. So you've got plenty of time to get it done in time for Easter in a few weeks.
 Click HERE for the felt food tutorial and patterns
Click HERE for the foldable felt playmats pattern and tutorial
Click here for the on the go car and crayon holder tutorial

And this month has no shortage of freebie printables either! Like I said, I'm totally in love with the bright colors and the sayings of spring. These printables are fun to use as cards, as tags on a treat plate, or part of your seasonal decor.

 Click HERE for the St. Patrick's Day subway art
Click HERE for the Easter subway art

Click Here for the lucky in love printable


 Click here for the Let's go fly a kite printable

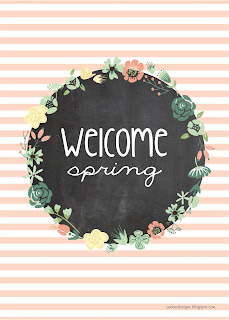
 Click HERE for the welcome spring subway art

As always, please do not use these prints commercially in any form. They are for personal use only. And don't forget to check out my etsy shop! Remember, I do custom orders too! If you liked this post, or any others, please LIKE, SHARE, and PIN. Word of mouth is what keeps my small business going. Thanks for stopping by!