Wednesday, October 1, 2014

Confessions of a Wannabe Seamstress: DIY Frozen Costumes

One year ago I did my first wannabe seamstress post as I undertook my first every sewing project since 7th grade Home Economics. At the end of that post, I mentioned how much fun I had sewing and wanted to do it again. Well, I've finally dusted off the sewing maching (actually, I finally got my own sewing machine instead of bumming off my MIL's) and am ready for round two!

I almost had my daughter convinced that she should be a witch for Halloween this year. With baby #3 due anytime, I'm not sure I'll even feel up to trick or treating. We have all the supplies at home for a witch costume. We went to the store to buy a child's size witch hat and that's where my plan unraveled. My daughter saw her dream costume hanging from a display rack. Three guesses you can get it right. Yep...Elsa. Of course the store didn't have her size and all online searches were fruitless (either they were out too or wanted a small fortune for it). Finally, I said to myself "it can't be that hard" and off to the fabric store I went for inspiration!

Now, I am not a clothing sewer. So Elsa's dress is my own take on the amount of the work I wanted to put into a costume that will be worn for one night and then stuffed into the dress up box for ocassional use. I also had to keep in mind that it's pretty cold where I live on Halloween, so I had to think about layering and coats. Finally, I tried to use some things that I already had at home.

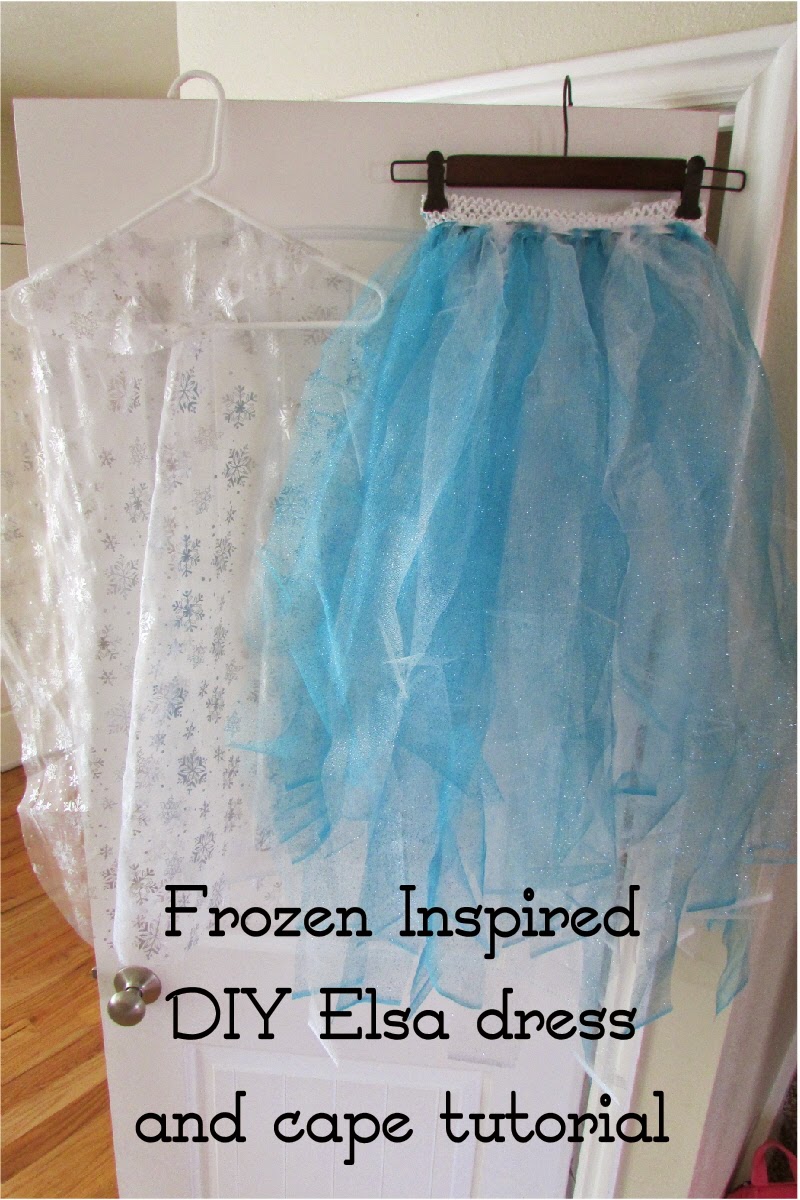
So here it is:


I used a white shirt my daughter already had for the top of the dress. Underneath the skirt, she'll wear a pair of thick white leggings I found, but really on Halloween night she'll probably be wearing snowpants under it. At the fabric store, I bought 2 yards each of white and blue tulle (the kind my daughter picked out had glitter in it). Then we got a yard of the sheer fabric for the cape. A visit to the dollar store and we found the crown to match. I used some leftover elastic I already had and I was good to go!
 First, keeping your tulle folded in half, lay it out on a good cutting surface. I love cutting things out on my kitchen table because it's tiled and helps keep me from cutting crooked lines ;)

I cut my tulle in 3 inch wide strips.
 Once all your tulle has been cut, unfold it and lay it out. I wanted my Elsa dress to be extra full, so I double layered the tulle. I did a line of 2 blues, a blue/white, a white/blue and then white/white. After I had several done, I laid my elastic across the middle. Measure your child's waist and then cut 1-2 inches (or more if needed) less than that (because it's stretchy). I always put a pin at my cut line and remeasure around the waist before I do any actual cutting just to be sure of my measurements.
 Take the two ends of tulle and just knot them around the elastic, sliding your knotted pieces over as you go.

 See, all that I laid out, only did this much of dress!

 I pinned the end of my elastic so the tulle wouldn't slip off as I pushed it over.
 After lots of tying, I was finally done! You could easily just use the elastic as is, but I bought a yard of headband lace at the store to sew over the top of the bare elastic. It covers your knots, which I liked. Don't forget to sew a quick line where the two ends of the elastic meet to complete the circle.

I used this tutorial from Make It-Love It to the make the cape. It was great! The only thing I changed was I didn't add a train. Since this was for trick or treating I didn't want her to trip on it or anyone else to step on it.


I think this tutu version of Elsa's dress turned out pretty dang cute and you can use these same principles to make all sorts of princess dress up: use green tulle and a purple shirt for the little mermaid or yellow tulle for Belle. You could even do black and orange tulle to make an awesome witch skirt.

Now what's an Elsa without an Olaf? Luckily, I have two year old who will glady play the part. At first I thought his costume would be a snap: white sweats for snowman body and a quick hat to top it off. Apparently, it was not to be--there were no white sweats to be found!! Luckily this tutorial from fabric.com for Olaf's hat and top and this tutorial from danamadeit.com for the bottoms SAVED ME! I'm pretty sure I'll use the top and pants patterns again to make more costumes. I'm already thinking things like have this boy be a fire fighter next year while our new little one debuting this year is the dalmation :)


Pointers for the olaf costume:

  • The tutorial says to use fleece, but I had white flannel on hand, so that is what all 3 pieces are made out of. I used felt for the buttons, teeth, nose, eyes, eyebrows, and hair twigs.
  • I hot glued the eyes and eyebrows on the hat and the buttons on the shirt to save time and effort instead of hand stitching.
  • The nose is two pieces of orange felt measured 3.5 wide and 4 inches tall. It took me a couple tries to get the shape just right (it's not a triangle...more like a rocket shape!). I used my machine to sew it together (leave an opening) and then turned in rightside out, stuffed it, and then hand sewed it on the hat.
  • I just did a front band on my hat (I still am not sure what the back band in the tutorial is for, although if you wanted a snug fit, I was thinking you could easily do a band around the back with an elastic).
  • For my front band: I measured 2 strips of fabric the same width as my hat. They were about 2 to 2.5 inches wide. Then I cut the two strips so they were rounded more like a baseball cap (or newsboys cap). Leaving a space for the teeth, I used the machine to sew the two pieces together, flipped them rightside out, ironed the crease, and then sewed it to the front of the hat. Then, I added the teeth in the space I had left open.


Happy Halloween!


Sunday, September 7, 2014

Holidays Ahead!

Usually I'm pretty anal about celebrating a holiday only during it's appropriate month, but since baby #3 is going to make a debut sometime in the next 7 weeks or so, I have been thinking ahead a little bit. Usually I would dedicate September to something back to school related (and I still might, there's a print I'm dying to do), but instead I'm thinking ahead to my very favorite holiday in October. 

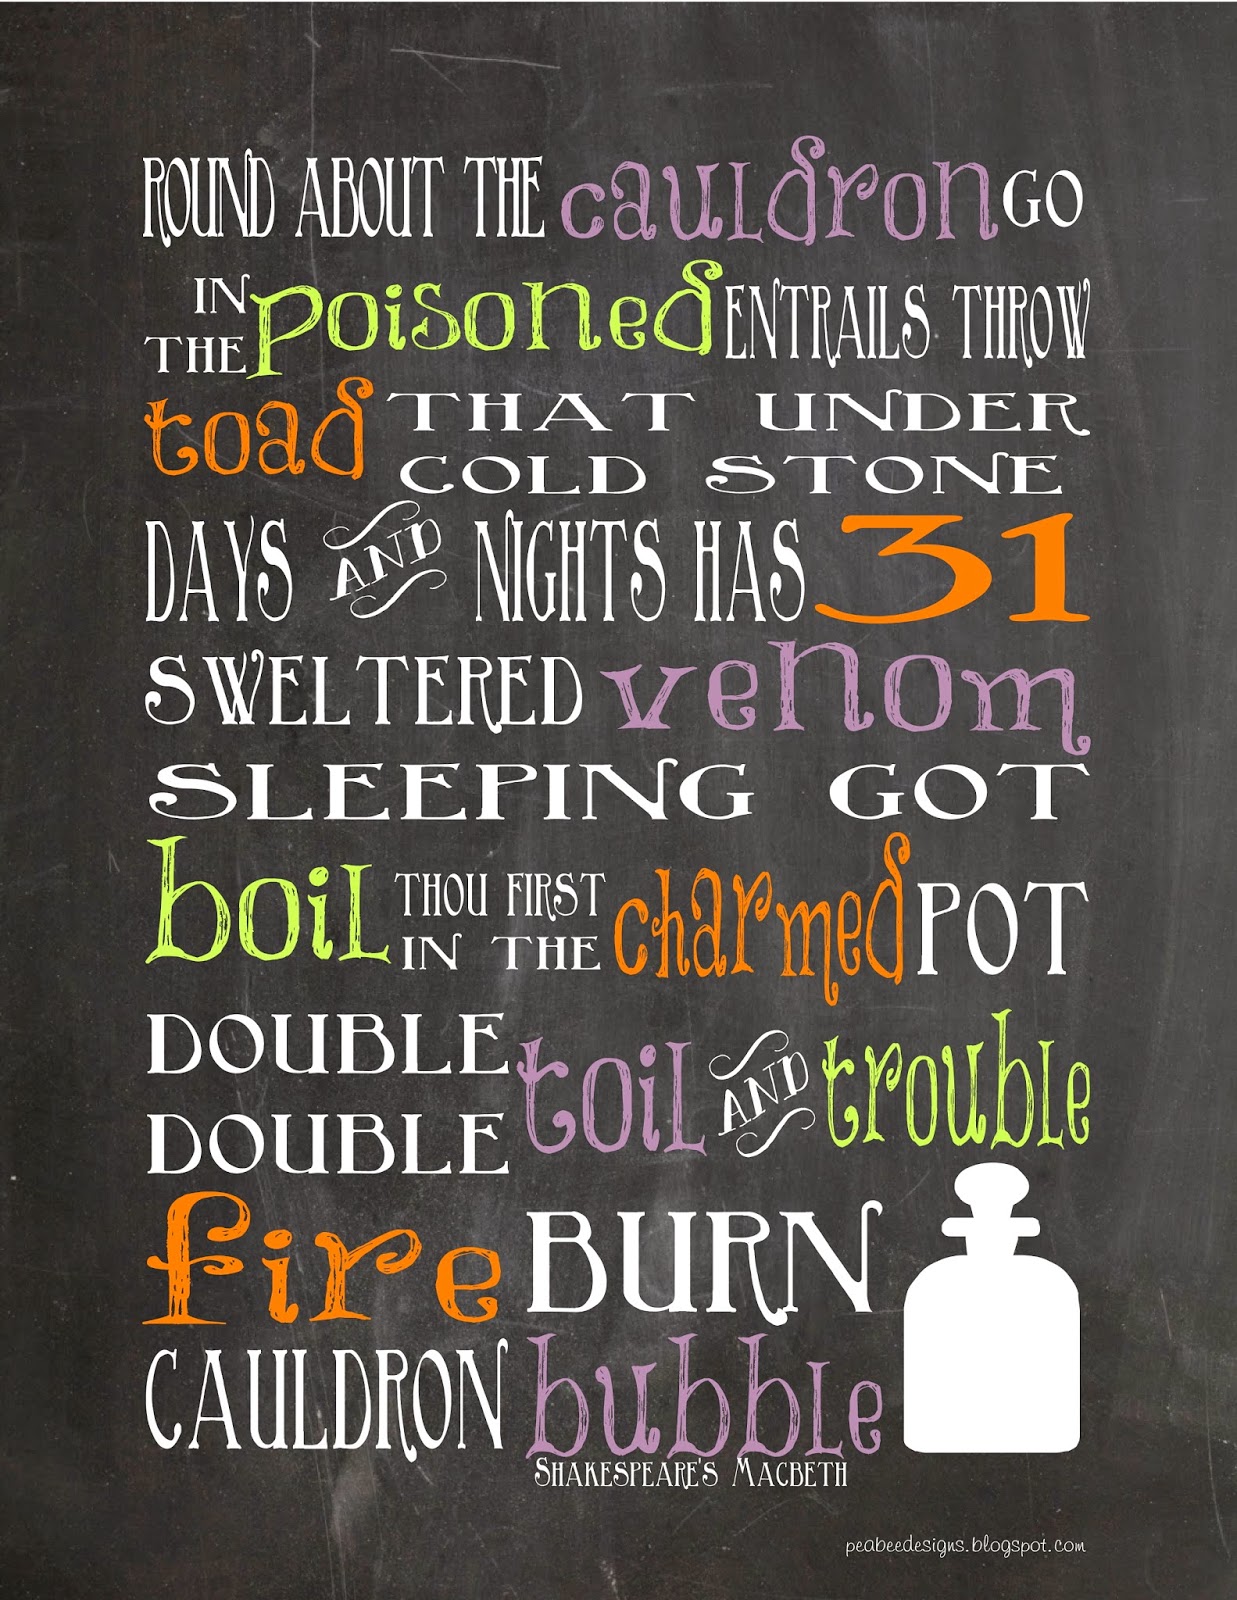
I've seen several different versions of this print flying around, and decided to add a version of my own to the mix. I love this for Halloween and think it would look cute framed, hanging on a door or in a window for Trick or Treaters, or even just set out next to your bowl of candy on the front steps if you're not answering the door that night. There are several different colors to choose from, so hopefully there's one you like too.

 To download the chalkboard print, click HERE
 To download the green print, click HERE
 To download the orange/black print, click HERE
 To download the orange/color print, click HERE
 To download the purple print, click HERE

I was an English major in college and one of my favorite classes I took was my Shakespeare class. I fell in love with Macbeth (the play, not the person....I tend to like the tragedies more) and have always thought some of the quotes from the witches would make great prints to display for Halloween. I should also note, for all you diehard Shakespear fans, that I did do a slight change of the wording. (i.e. I spelled out an abbreviated word, changed thirty one to a number, and eliminated an "and" at the end)
To download the Macbeth subway art, click HERE

Happy Haunting! Don't forget to pin, like, and share this post so others can take advantage of my printables too. My etsy shop is also up and running. I have a few new items and am still taking custom orders, but I'll be limiting the amount of orders and how often I renew items after my new little goblin arrives--so order early!

Find more Halloween posts from me HERE and HERE

Monday, July 21, 2014

MIA no more! July Freebies x2!

I know it's been pretty quiet around here the past few months, but I promise I haven't forgotten about the blog or the monthly freebies. I'm back in action and since the reason for my MIA status has been because there's a new little bun in my oven, I thought a cooking themed freebie was appropriate :)

I usually write down my weekly menu on a post it or something before I head to the grocery store. Then sometime during the week the post it gets lost and I'm left scratching my head, "what were we going to have for dinner again?" I decided to design a printable (and reusable, I'll show you how at the end of this post) menu and shopping list to stay organized.
 To download the menu printable, click HERE

I decided to set up my shopping list a little differently. Instead of grouping things by labels like "fruits" or "vegetables" I tried to group them according to where they were located in the store. I am notorious for going back and forth across the store when I was just in that section! Hopefully this will help me stay more organized and I hope it helps you too.
To download the shopping list printable, click HERE
I printed mine as a 5x7 so it would fit in my purse. I even had the thought that you could print this double sided so your menu and your shopping list were easy to find and plan. There are 3 ways to make this printable reusable:
1. Put inside a clear sheet protector
2. You can purchase self laminating pouches at office supply stores
3. Take to your local printing store and have them laminate it for you
Then, simply use a dry erase to write and then wipe off when finished!

Don't forget to check out my shop on Etsy and don't forget that I do custom orders too! If you like this post, please share/like it on facebook or pin it! It really helps small business owners get the word out!

Thursday, March 6, 2014

Feelin' Lucky: Freebie Printable

I have always loved the song "Lucky" by Jason Mraz and feel blessed to be able to say that I am in love my best friend. Since St. Patrick's Day is coming up, I thought the lyrics to the song would make a fun print. Enjoy! And don't forget to check out my shop for more products you'll enjoy!

To download this print, click HERE

And if you're looking for a more traditional subway art style for St. Patrick's Day, look no further. 

For the subway art, click HERE

Make sure to like, pin, and share this page with others. Word of mouth is how small businesses stay afloat! And I love new fans. Like the peabeedesigns page on facebook and never miss a new freebie again!

Wednesday, February 5, 2014

Feeling the Love

Valentine's Day is just around the corner, and if you're like me, you might still be wondering what to do for those people in your life that you love, just not enough to spend a lot of money on them. Sorry, was that rude? You know what I mean, right? There are people whom I love to pieces, but because there are so many, my budget won't allow me to shower them all with extravagant gifts. There, that was a little explanation.

For a quick Valentine that is perfect for your child's class party, you can print these circles and attach them to plastic twisty straws. We did this last year for my daughter and they were a huge hit.
To download the Sip-Sip Hooray circles, click HERE
 Of if you need something more generic, you can download and print these circles to attach to plate of goodies.
To download the V-Day circles, click HERE
This printable was a popular one I featured last year. Pop this in a clear frame and use a dry erase marker to fill in the blank. This is fun for couples or to do with your kids. 

To download the I Love You Because print, click HERE
 And who doesn't love some V-Day subway art? This looks great printed smaller for cards or framed as part of your Valentine's Day decor.
to download the subway art, click HERE

Wednesday, January 1, 2014

Setting Realistic Resolutions (plus free printable!)

Ahhh, the new year. I saw a quote on Pinterest that went something like this: "Today is the start of a 365 page book. Make sure to write a good one." I love new beginnings. I love the feeling of optimism that envelopes me and the invincible feeling that says, "I'm going to do amazing things."  However, when setting resolutions for the new year, it's easy to get overloaded with setting too many expectations which quickly leads to feeling overwhelmed, and then before January is even over, we are saying, "Oh, why bother!"

I don't want this year to be like that. A long time ago, I attended a lesson at church where the teacher used the scriptures to illustrate how we should think about writing resolutions. I've never forgotten it and want to share it with you. The scripture is Luke 2:52 and it goes like this: "And Jesus increased in wisdom and in stature, and in favour with God and man." Jesus Christ is our example of how we can become well rounded people. 
  • He increased in wisdom: What will you do for your mind? Maybe it's to read a book. Maybe it's to take a class or study a topic you are interested in learning more about. Do something good for your mind this year.
  • He increased in stature: What will you do for your health? This can be exercise, eating habits, going to bed earlier...whatever fits into this category
  • He increased in favour with God and man. I like to split this last one into two categories. First, favour with God: "What will you do to increase your spirituality?" Maybe it's studying the scriptures with specific questions in mind. Maybe it's going and doing your visiting teaching each month or attending church more regularly. And second, favour with man: How can you be a good friend? One year my husband and I were feeling like we needed some more adult friendships (our kids are great, but...) so we decided we'd make it a goal to invite another family over for dinner at least once a month. It could be something like being more positive or more patient. Maybe you need to be a better friend to your husband or your kids. Goals relating to any relationships fit well in this category.

And you're done! Four goals to a more well-rounded you. Nothing impossible. No lists a mile long. And to help you on your way to resolution success, I made this free printable. It's sized to print as a 5x7 but the high resolution file lets you adjust the print size smaller or bigger. Feel free to print some for your church class or bring around to friends and neighbors.
Happy 2014!
to download, click HERE

Tuesday, December 31, 2013

Family Friendly 2014 Celebrations

Photo Credit HERE

Some of you may be like me: the days of staying up until midnight at some party or celebration are long gone. Replacing party outfits are comfy PJs. Instead of a fancy dinner we'll stay in and eat homemade/frozen appetizers and pizza. Dancing with my current crush is replaced with dancing with Mr. Right and the two kiddos. And the party music will most definitely be kid friendly. 

 With two young children who just celebrated a pretty big holiday last week, I don't want to do anything too spendy or over the top. We won't have anyone coming over so it will be just the four of us. But this doesn't mean that New Years Eve can't be memorable or fun.

I took this week off from designing anything new, so these ideas are not mine. I love this person's approach to a fun, family friendly New Year's Eve. The ideas are simple and perfect for my kids. You can find her New Year's Eve party plan HERE. She also links over to another website where you can download a PDF for a "Year in Review" Page for each member of your family to fill out.

Midnight may come at 9pm for us, but you can be sure we'll be making memories and hopefully some new traditions too.